


 Here’s a project that took a few risks. The biggest risk is that this was an actual artistic design, instead of making variations and embellishments on an established design. It would also be on the front of my house, exposed to the elements as well as the critical eye of my neighbors. (I live in a university neighborhood, and education can be an ugly thing to behold.)
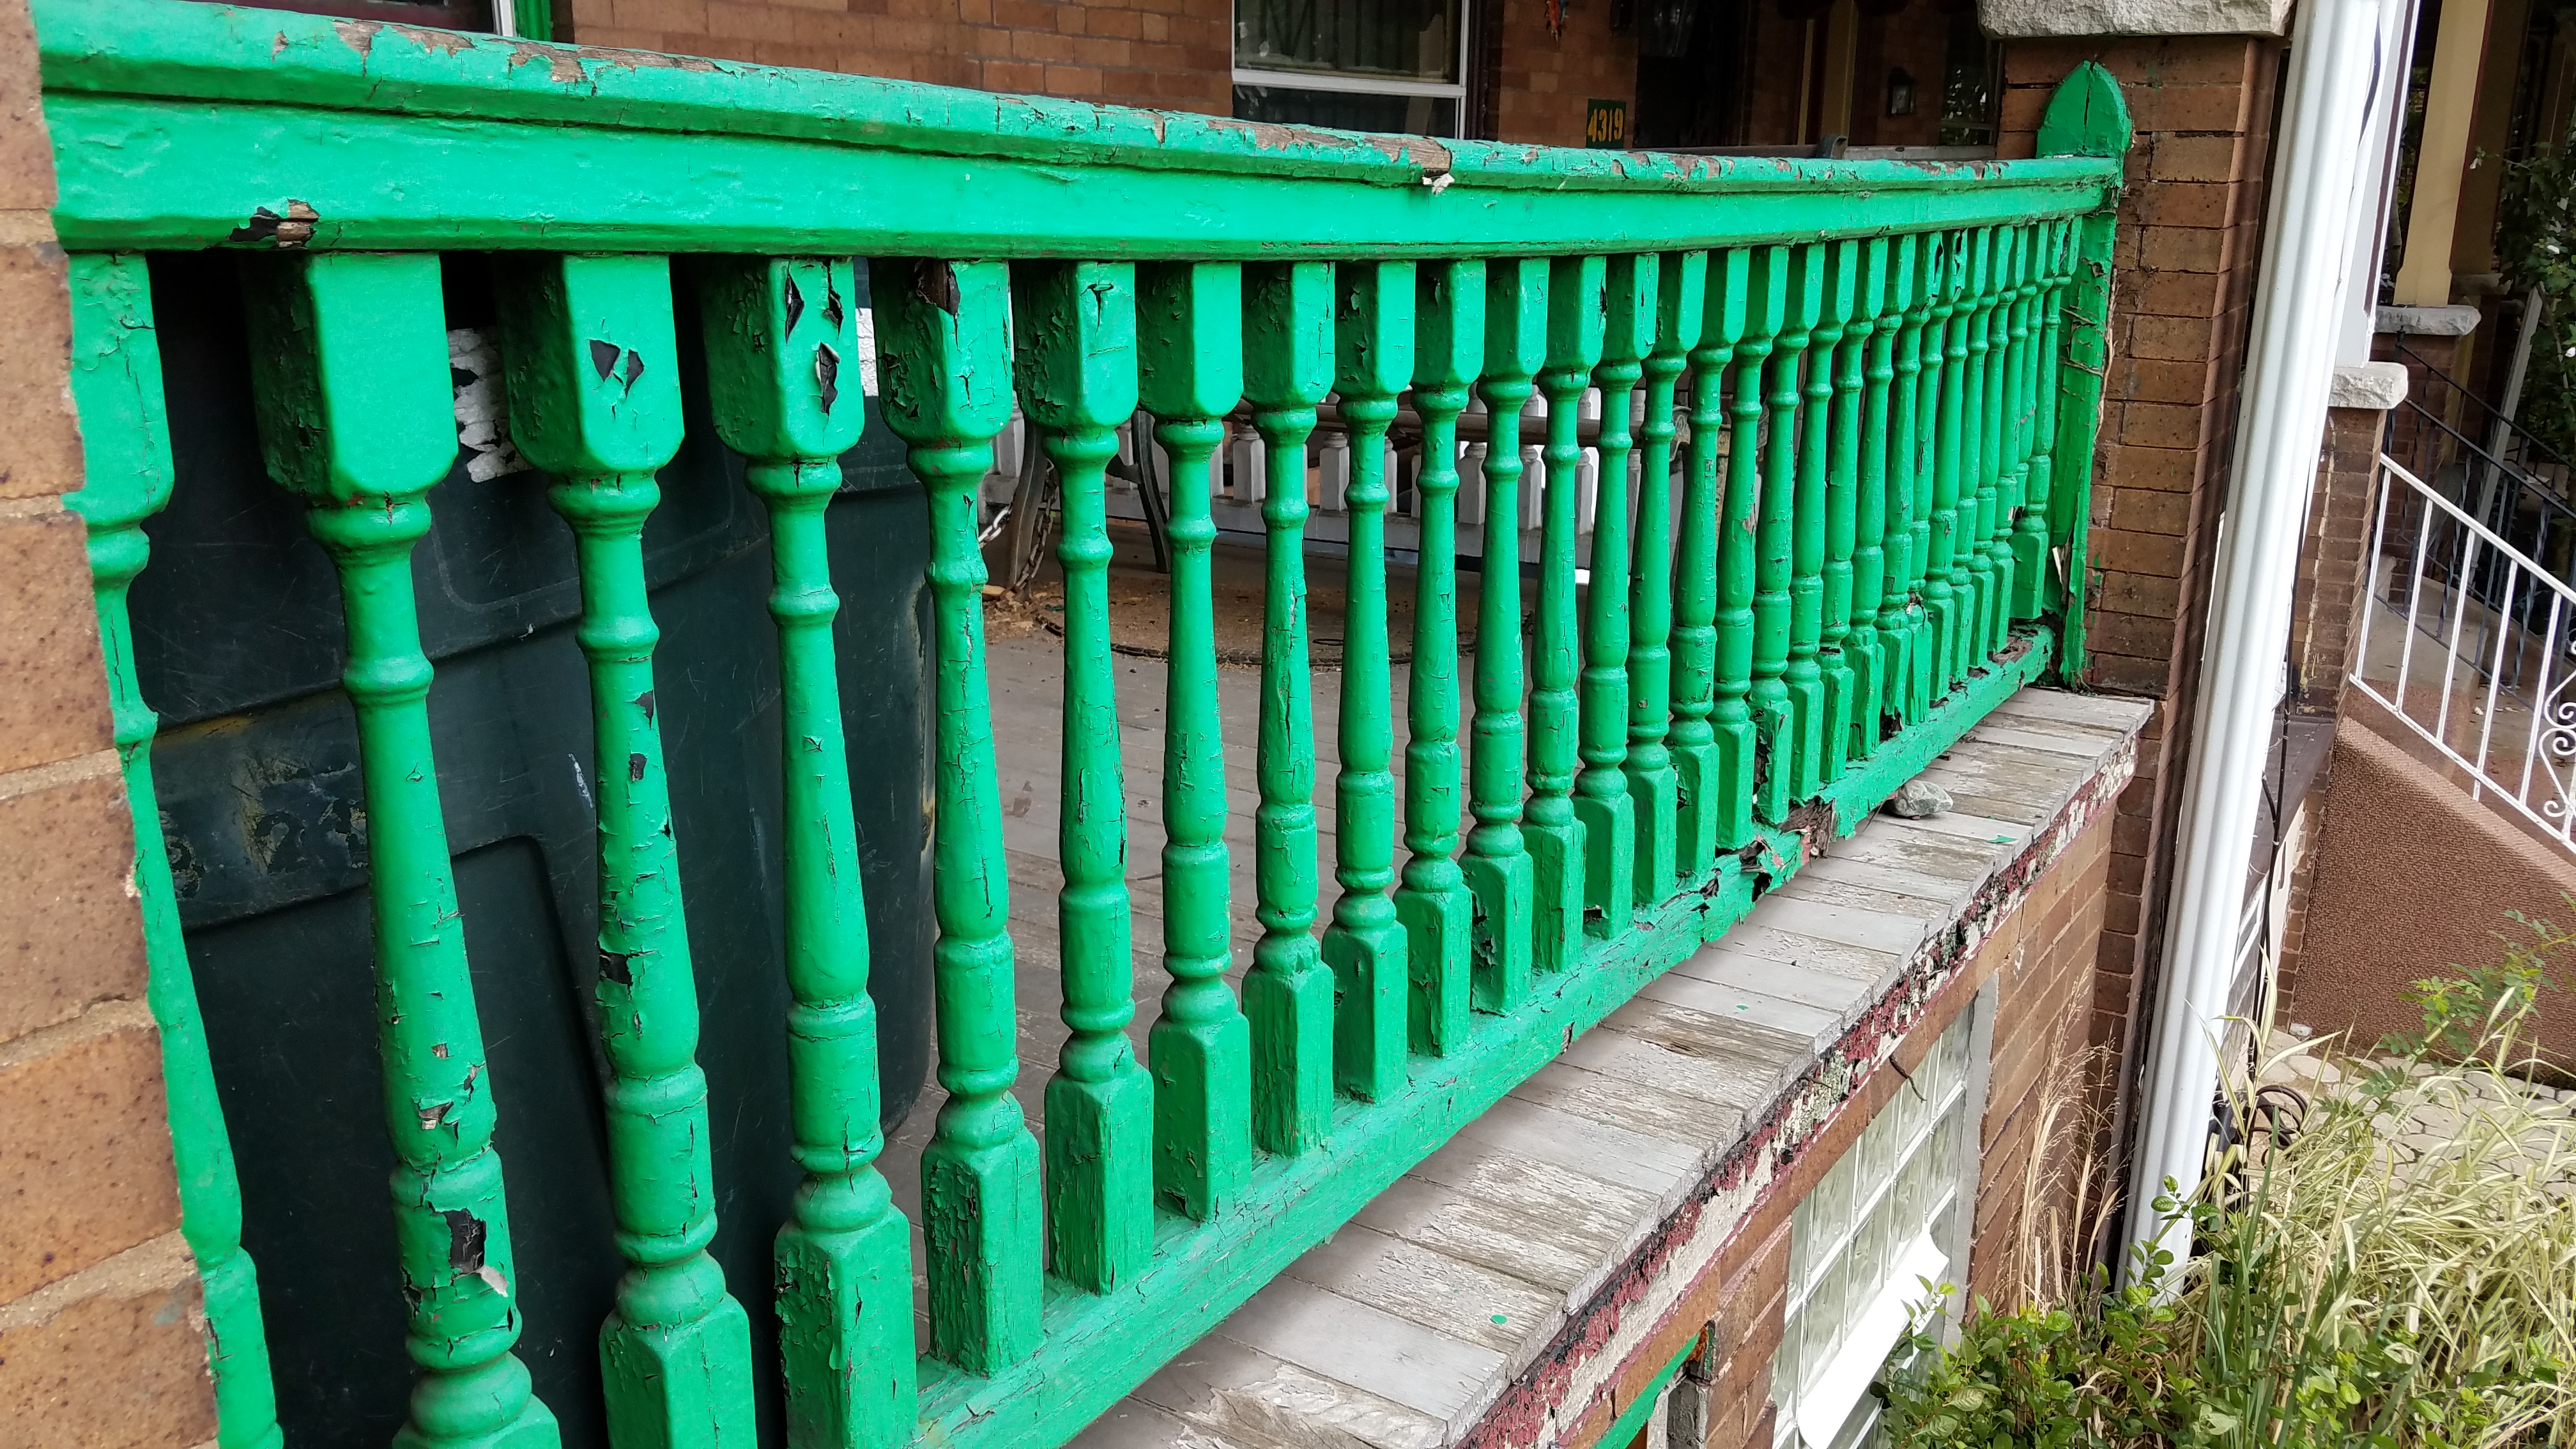 My house was built in 1917, and here’s a photo of the porch railing as it was for, well, the last hundred years or so. It was splintering, rotting, and probably harboring some insects, so it had to go. I found that, when I removed it, it was being held in place with two nails at one end.
I could have simply worked up a set of spindles that looked vaguely like the originals. There’s a lumber yard nearby that recreates a lot of trim patterns. My neighborhood is full of old Victorian and Arts and Crafts-style row homes that have avoided developers’ blight, so imitating or “restoring” the originals would have been an easy job with a built-in appreciation from the neighbors. Or, I could have hired an ironworker to make a decent porch railing much like the railing on my front steps.
But, I wanted to do something a little unusual– the neighborhood’s also got a history of middle-class bohemianism, which is one reason I moved here. It had to meet code, of course, which basically meant that no gap should be larger than a 4-inch diameter sphere. (Why four inches? Babies’ heads.)
I started with my constraints– height, width, city code, weight-bearing– and sketched a lot of ideas over the years. I like to use Corel Draw to make worksheets for projects: I lay out the rough dimensions, add some notes on the side with measurements, and print out a few dozen to use as worksheets in the local cafe. (For example, if I was to redesign a bathroom, I’d use Corel to make a worksheet with the walls and doors, plus the locations of the drains and water supply lines– basically, all the stuff that can’t be changed– and then print that out, and sketch ideas on top of it.)
And here’s the kicker. In 2017, I finally had the cash and the free time to spend two weeks in Paris. Yes, France. THAT Paris. One of these days, I’ll gather up my Facebook notes about my trip and post all of my naive touristy opinions for your entertainment. But for now, lemme focus on how I was finally able to get up close with Hector Guimard’s iconic Art Nouveau designs for the Paris Metro stations. Here in the States, the closest I could get was in art books, and an Art Nouveau exhibit at the National Gallery in Washington. But in Paris, I could actually touch these gorgeous things.
I’ll save the discussion for another page, but ever since I got back I’ve been wondering how I could recapture some element of Paris over here. It’s a really complicated issue– I basically stuck to the usual tourist stuff, without a care about things like bills or costs or time, Paris and Philadelphia have radically different histories, some things you can’t duplicate, etc. It’s not like making a Disneyesque imitation of a cafe or a Metro station. Frankly, it’s like trying to recapture a smell from a memory. (I probably should just learn how to cook decent food.)
And while Guimard’s exterior designs were executed in iron and stone– and they were designed by a genius– I’m barely a woodworker. I’d need to design something that’s somewhere between My Limited Skill Set and Actual Elegance. It also needed to be something I could put up quickly, and improve in pieces later on. At best, I could make something that was evocative of Paris, but nothing better than that.
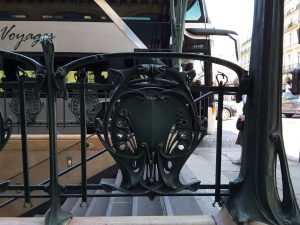
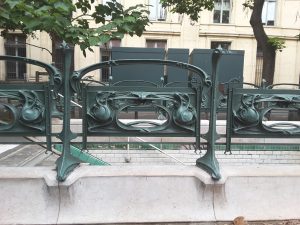

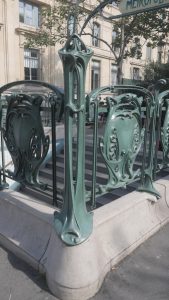
The sketches I’m posting here may not show my process, so here’s some explanation. A design that spanned the whole railing wouldn’t work: it’d take me years to settle on it, and making it’d be beyond my abilities. (I did like the idea of sculpting a Giant Squid entwined among standard-issue spindles.) So, it had to be in sections. Paris is full of 19th century ironwork, like the Metro stations and the Gare d’Orsay, and there’s this big tall iron thing south of the Trocadero that attracts a lot of tourists. So making my porch railing look like ironwork was vaguely possible: perhaps a buncha fake rivets and some metallic paint could accomplish an illusion. (Also, the use of carriage bolts would add to the iron-bolt illusion as well as enable me to replace parts efficiently.)
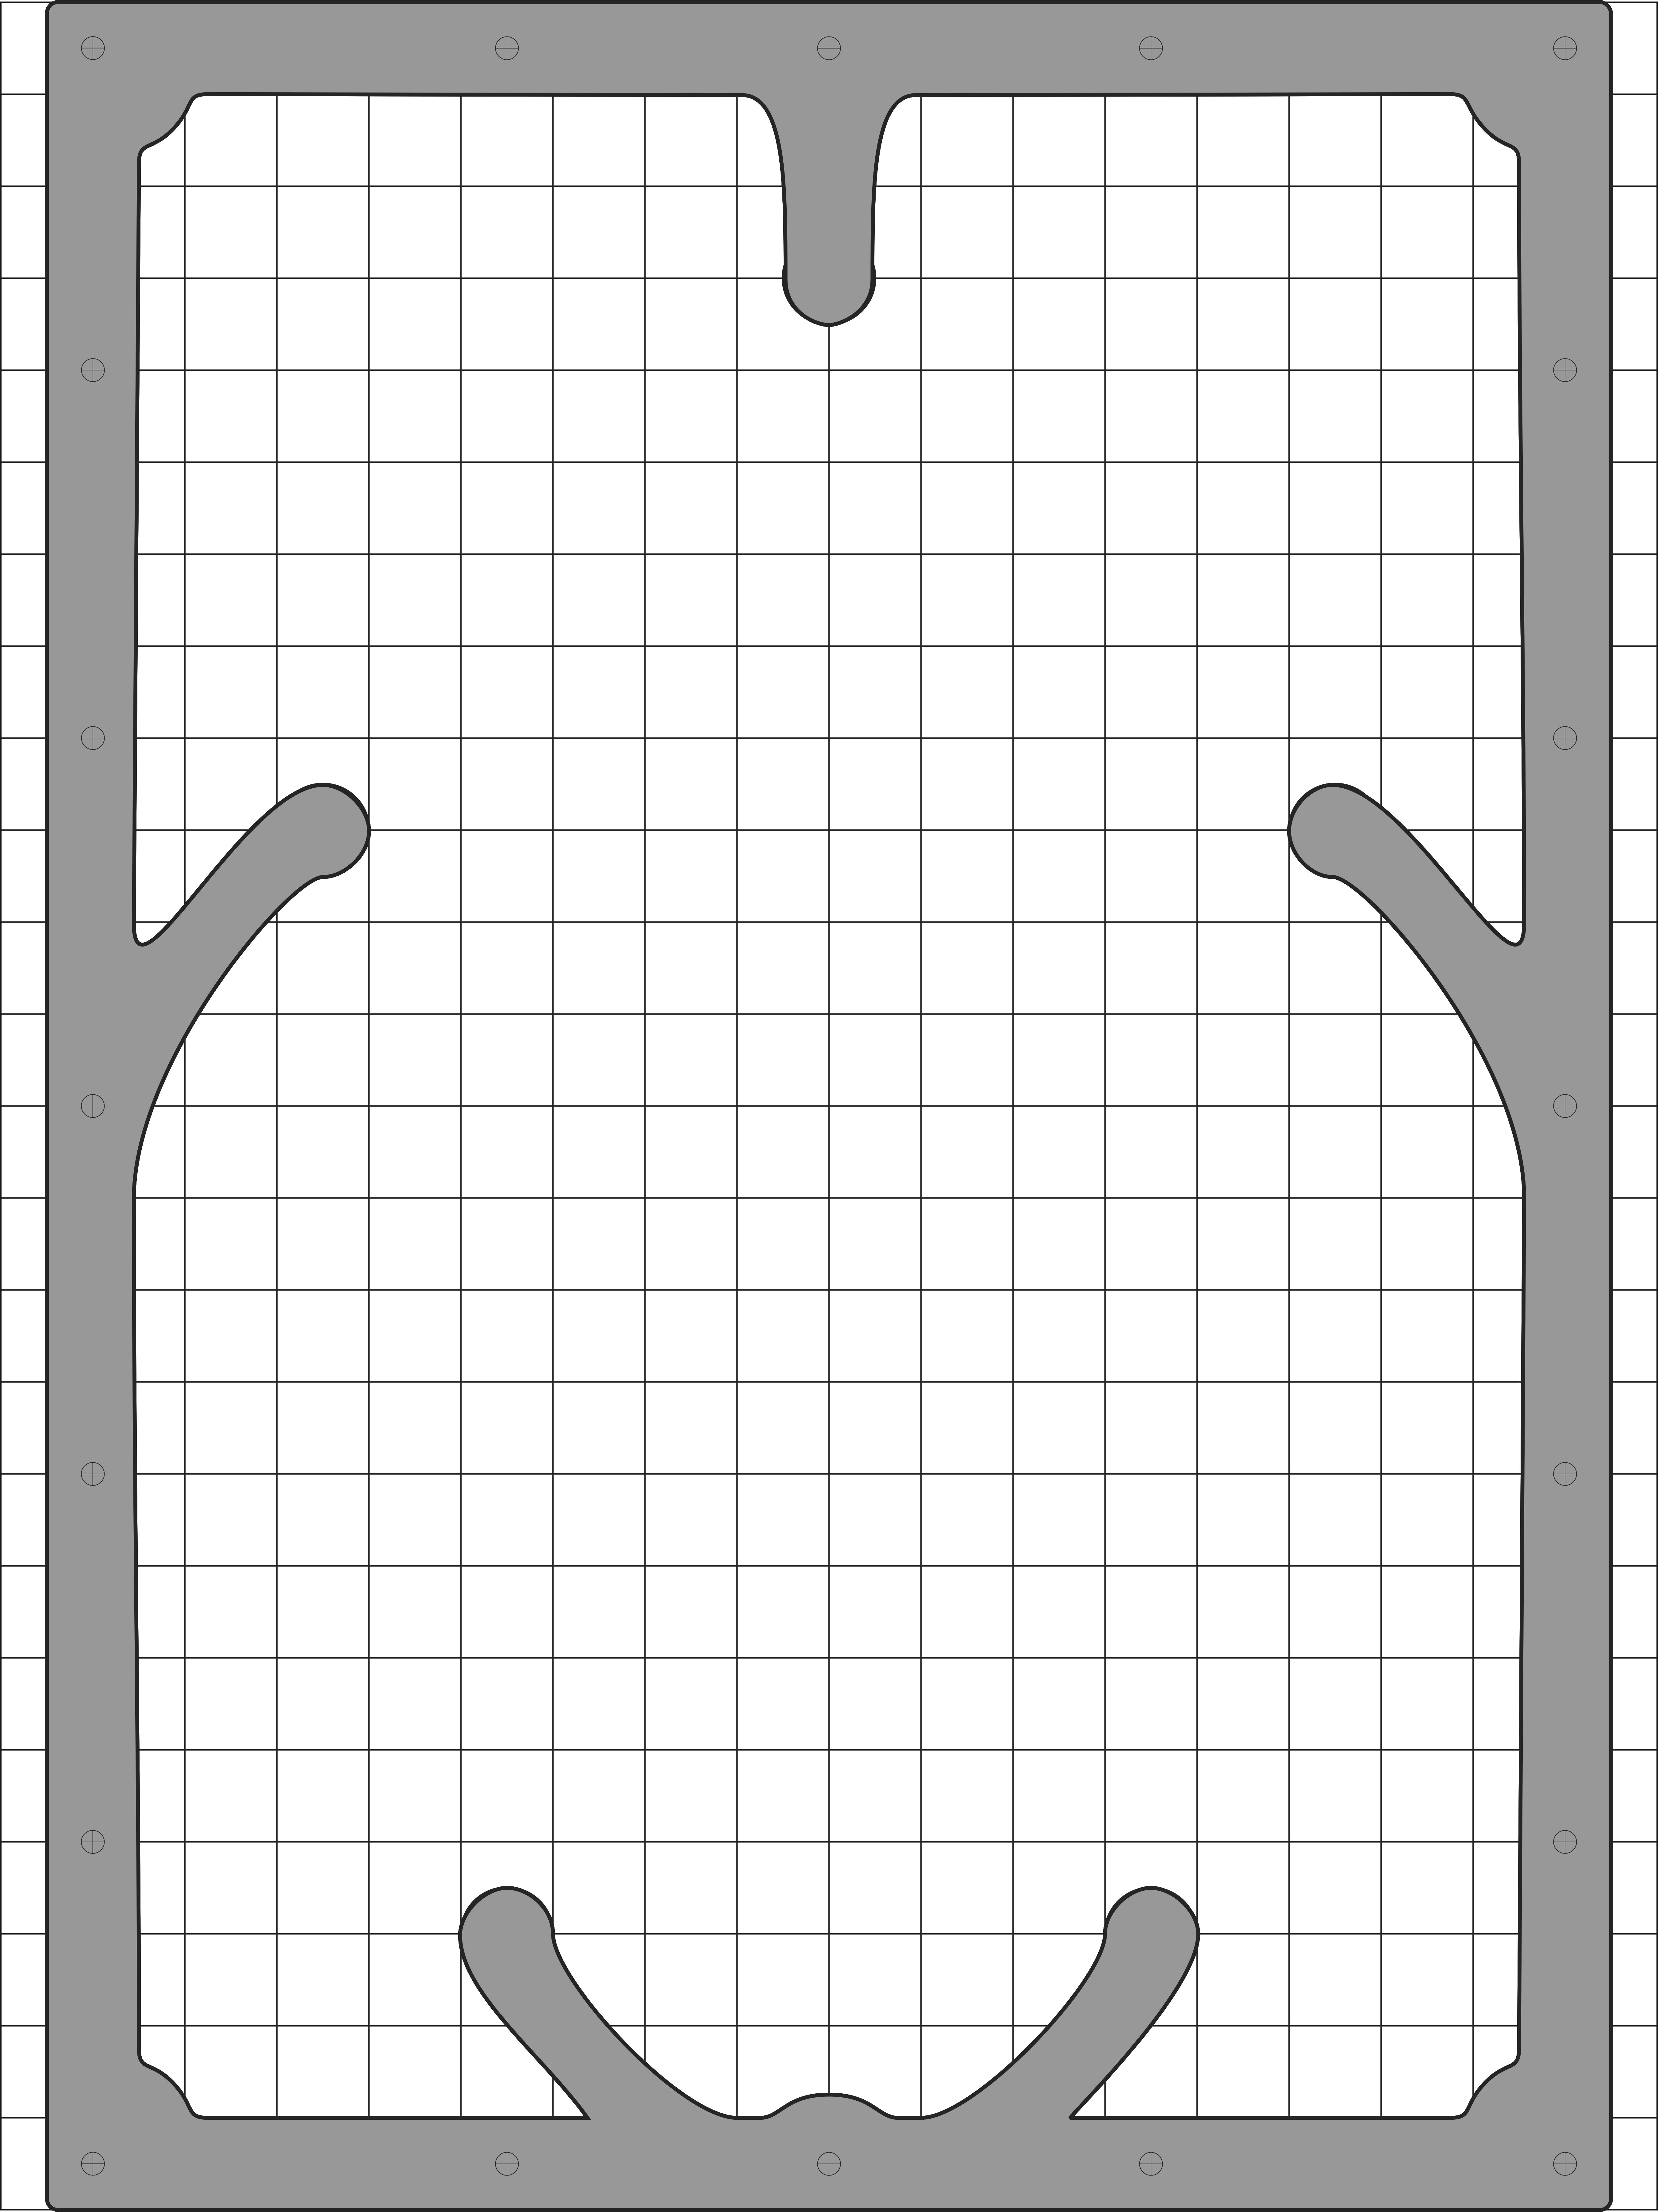 I eventually settled on a design where the overall frame would look like sturdy ironwork, but it’d be divided into a number of Guimard-ish frames of nice curves that could be bolted onto the front. A little work came up with this as a nice shape. It wasn’t too spindly to hold up in the elements, or splinter if a baseball hit it. And it offered five points of connection for any designs I could put in the middle.
To size the frame, I did some math and some sketches. The railing was 114 inches wide, and I had to fit in six frames plus some spaces in between them, If the frames were a nice, even 18 inches wide, they’d take up 108 inches– leaving only six inches for those in-between spaces. So, the frames were rescaled to 17 inches in width, which gave me more room for the in-between spaces.
How was I going to make this shape? I thought about using a nice, weather-resistant wood like teak. I could assemble each frame from four parts. I could rough cut it with a bandsaw, and fine-trim it on the router table with a plush-trim bit. A quick experiment in the router table with pine killed this idea: a flush-trim bit caught on the grain and chipped out chunks at the thinner points. It’s not safe when a router does that, people. Also, I’d have had to join the four pieces into a single frame– and no matter how I did that, it was going to be a little rickety.
So the final shapes were routed out of plywood, as one single piece. I’d thought of using marine-grade plywood, but a little research showed that that stuff’s difficult to paint. Also, I suspect that the glues and epoxies used would have made them difficult to rout, as well. So I decided to use plywood, apply a Killz primer and at least two coats of good exterior-grade latex paint, and rely on that for some protection against the elements for a few years. Or, at least until I came up with something better.
I designed the template using Corel Draw. I printed it out on paper, full size (17 inches wide by 24 inches high), and pasted that onto quarter-inch MDF as four pieces. I trimmed that down to the outlines on the bandsaw. I then attached the four MDF pieces to a full 24×17 piece of MDF, and used the router and a template bushing to cut two single-piece 17×24 templates– an original, and a backup.
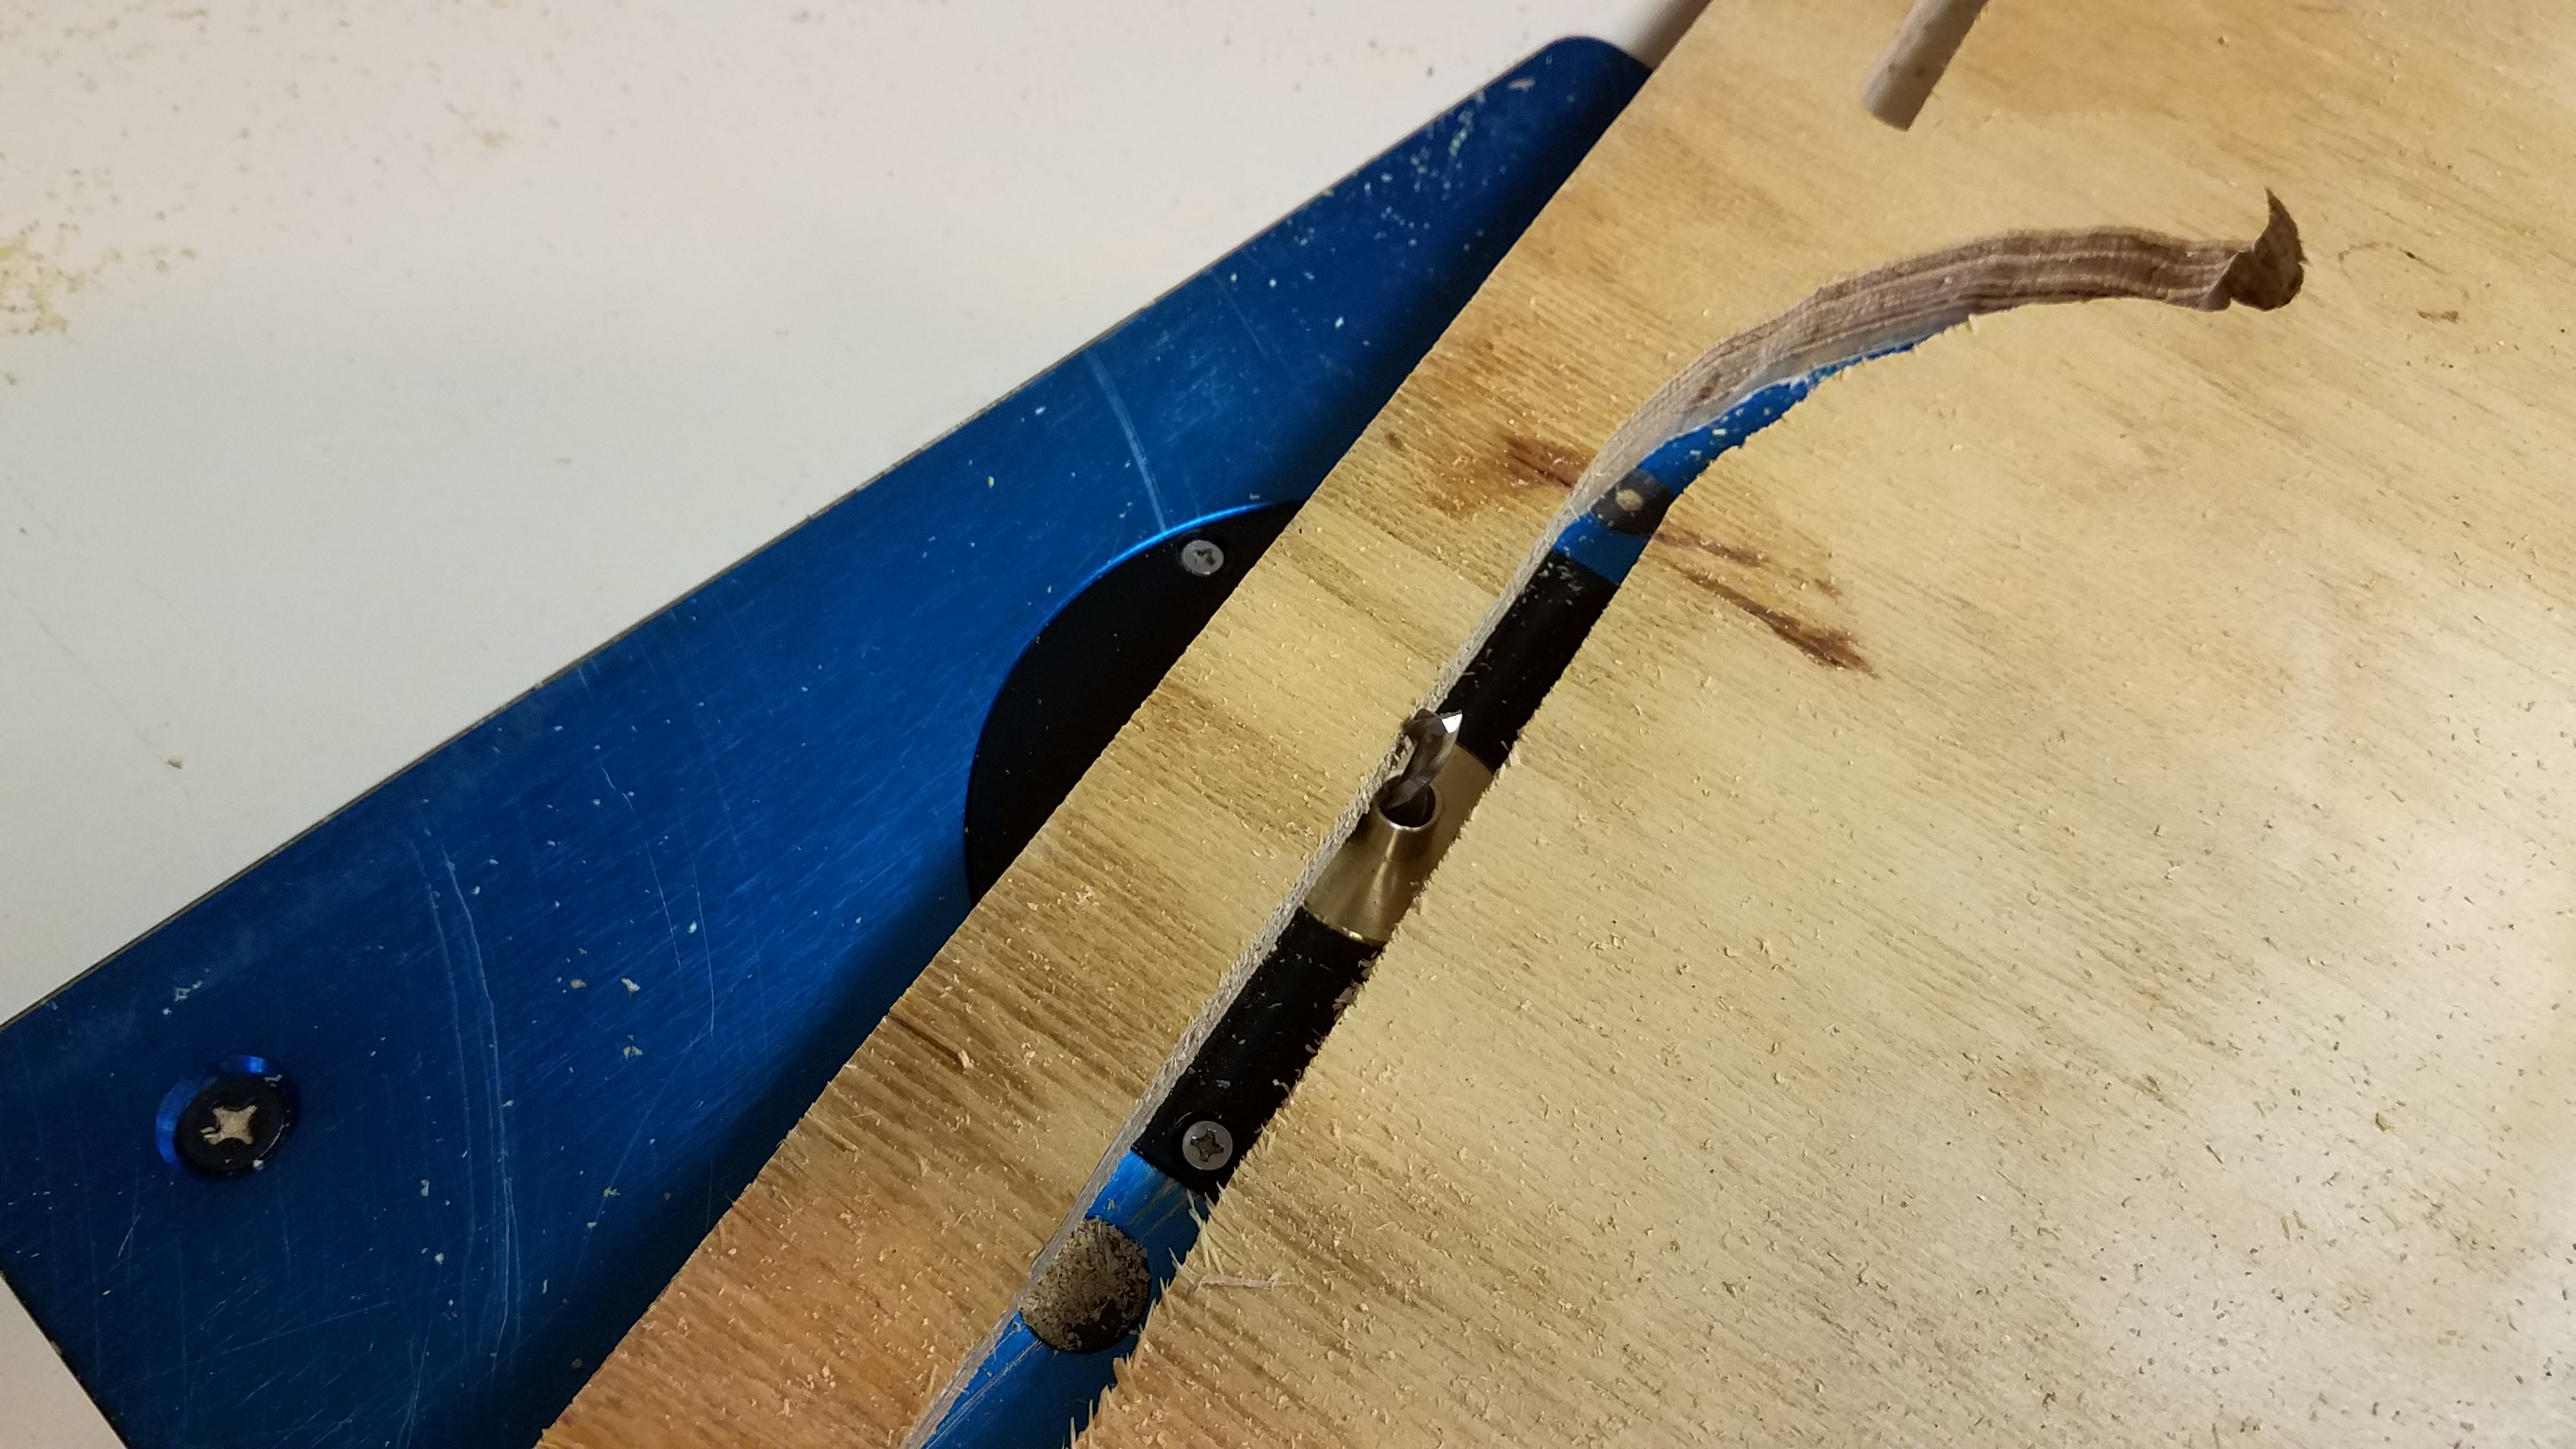
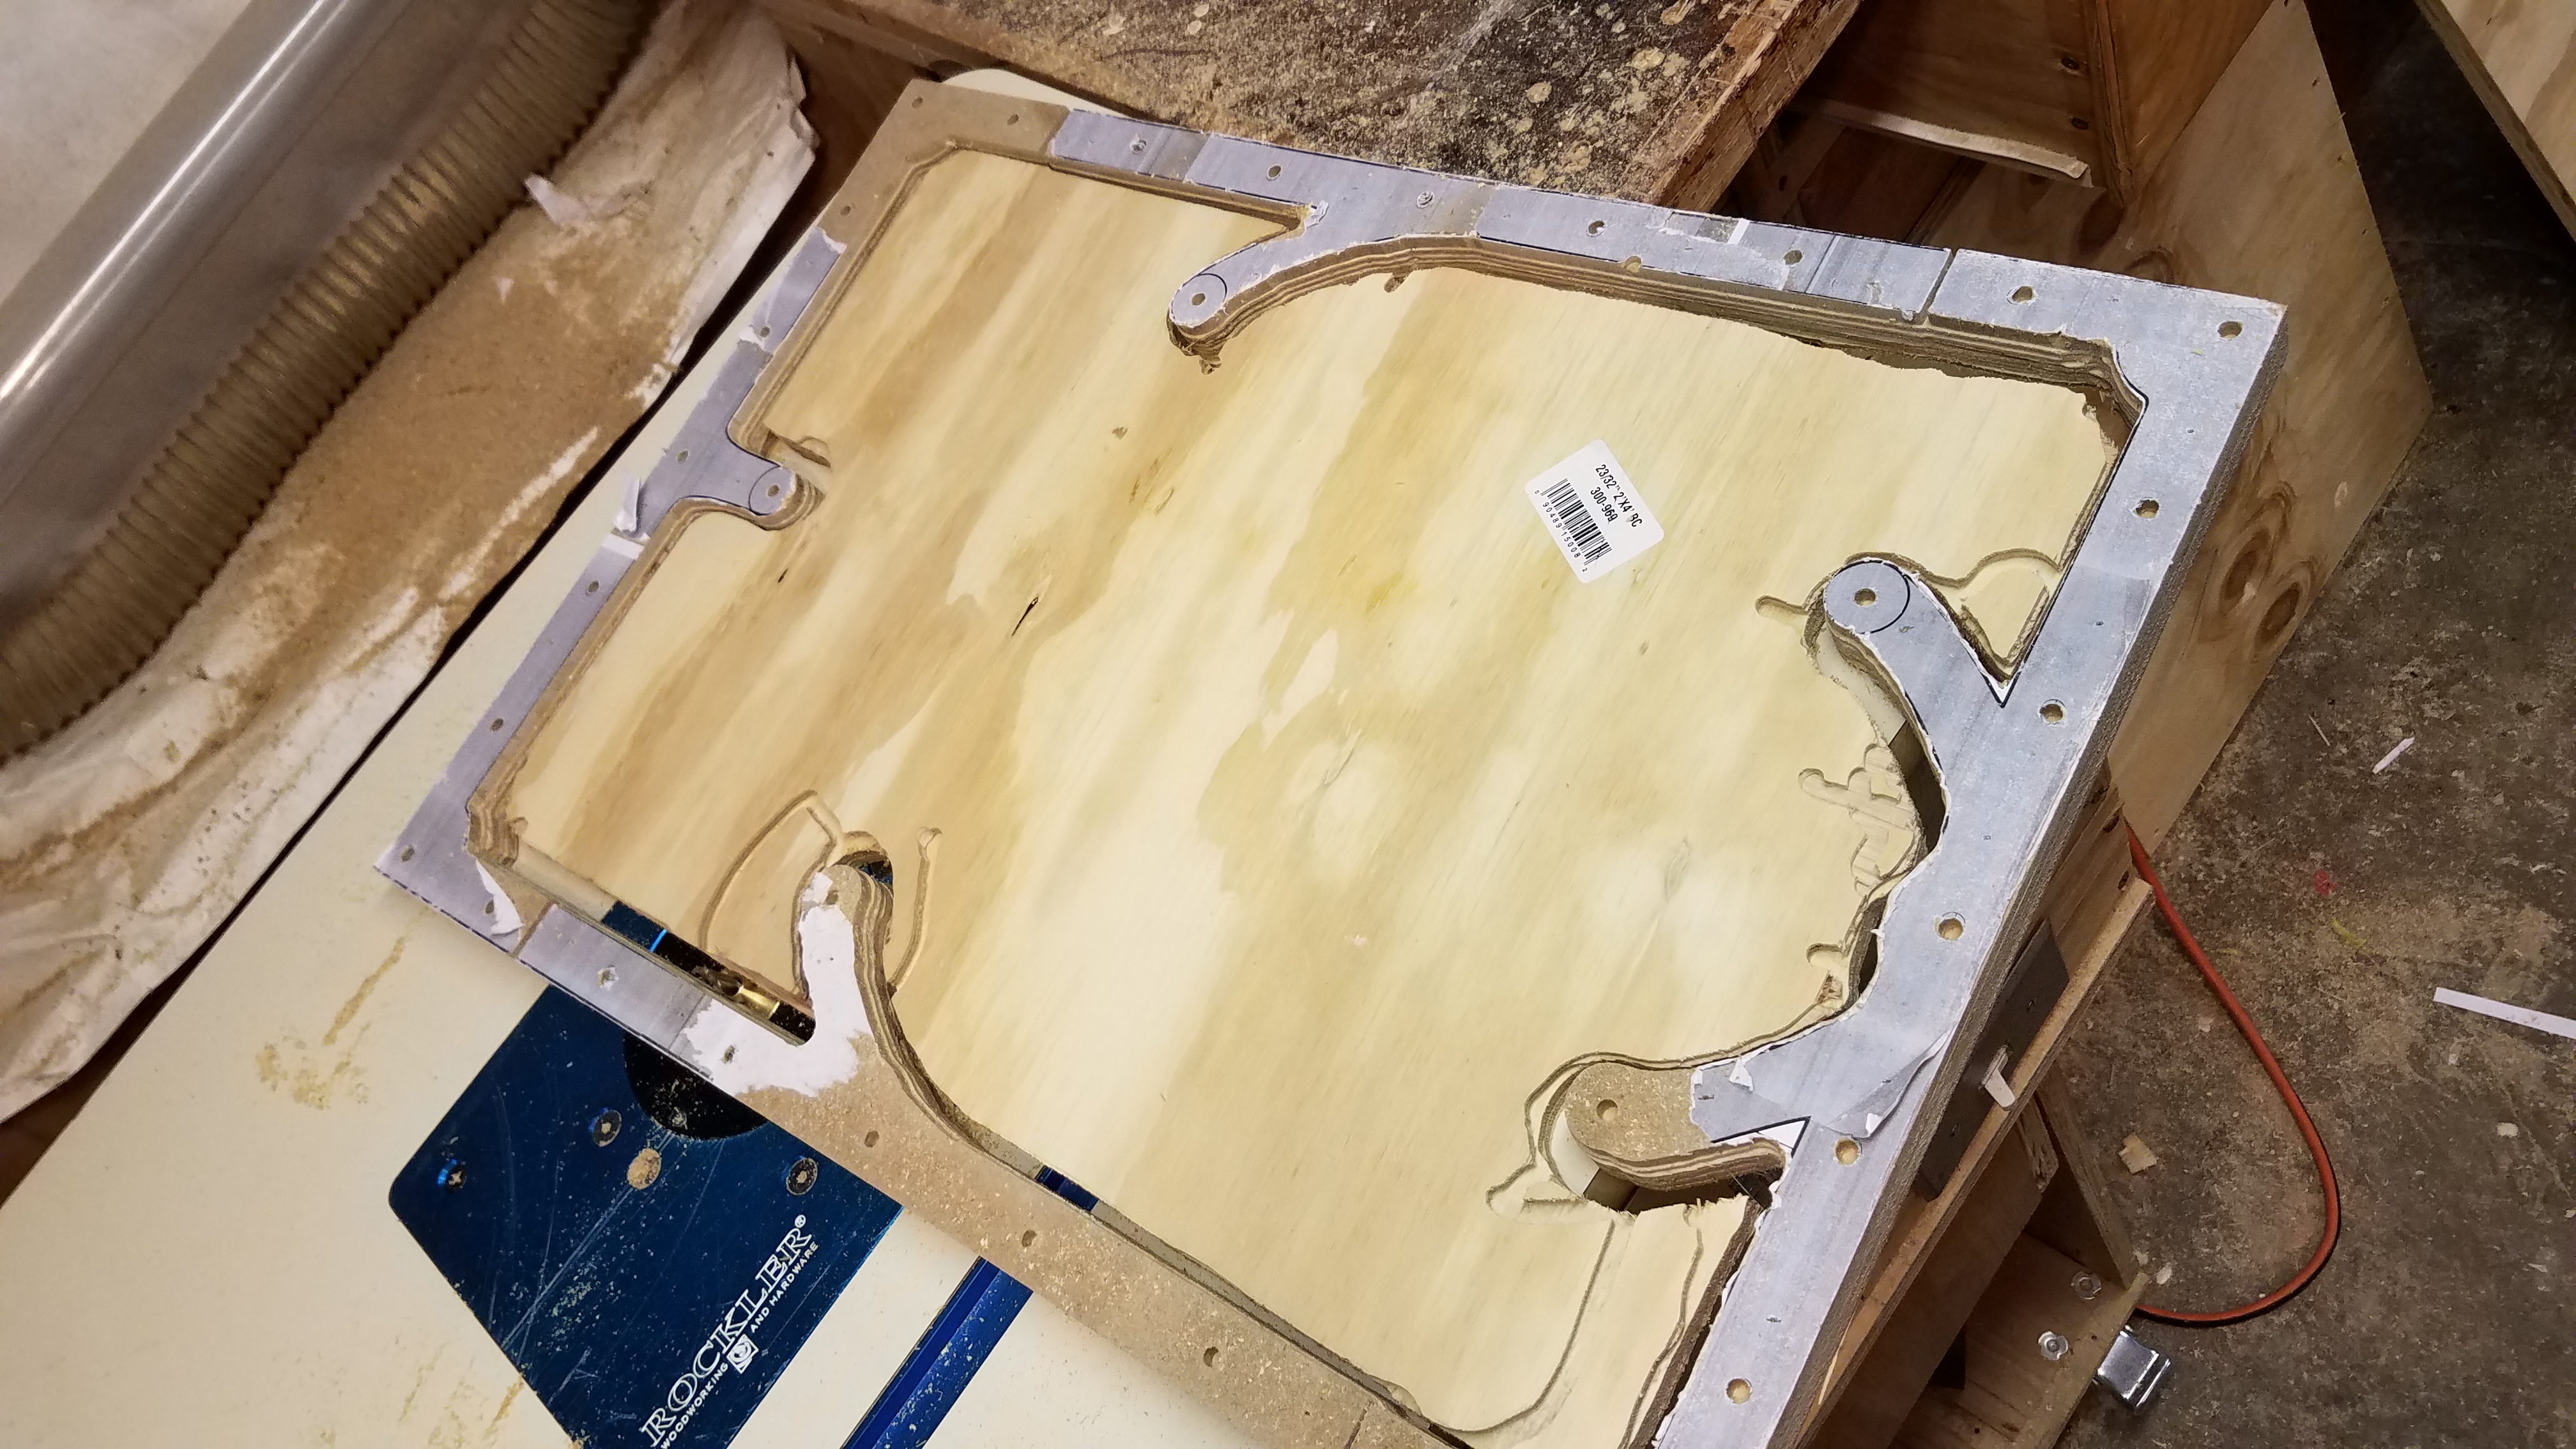 So I took this full-frame template, finish-nailed it to a piece of plywood, and put it template-down on my router table, where I had a spiral bit and a template bushing guide installed. I could then move the plywood over the bit, with the bushing up against the template, and it would carve the outline. This couldn’t cut the entire ¾” thickness all at once: I had to do this in three or four passes, about a quarter-inch deeper each pass. It took a long time, but it got me six frames cut out of single sheets of plywood.
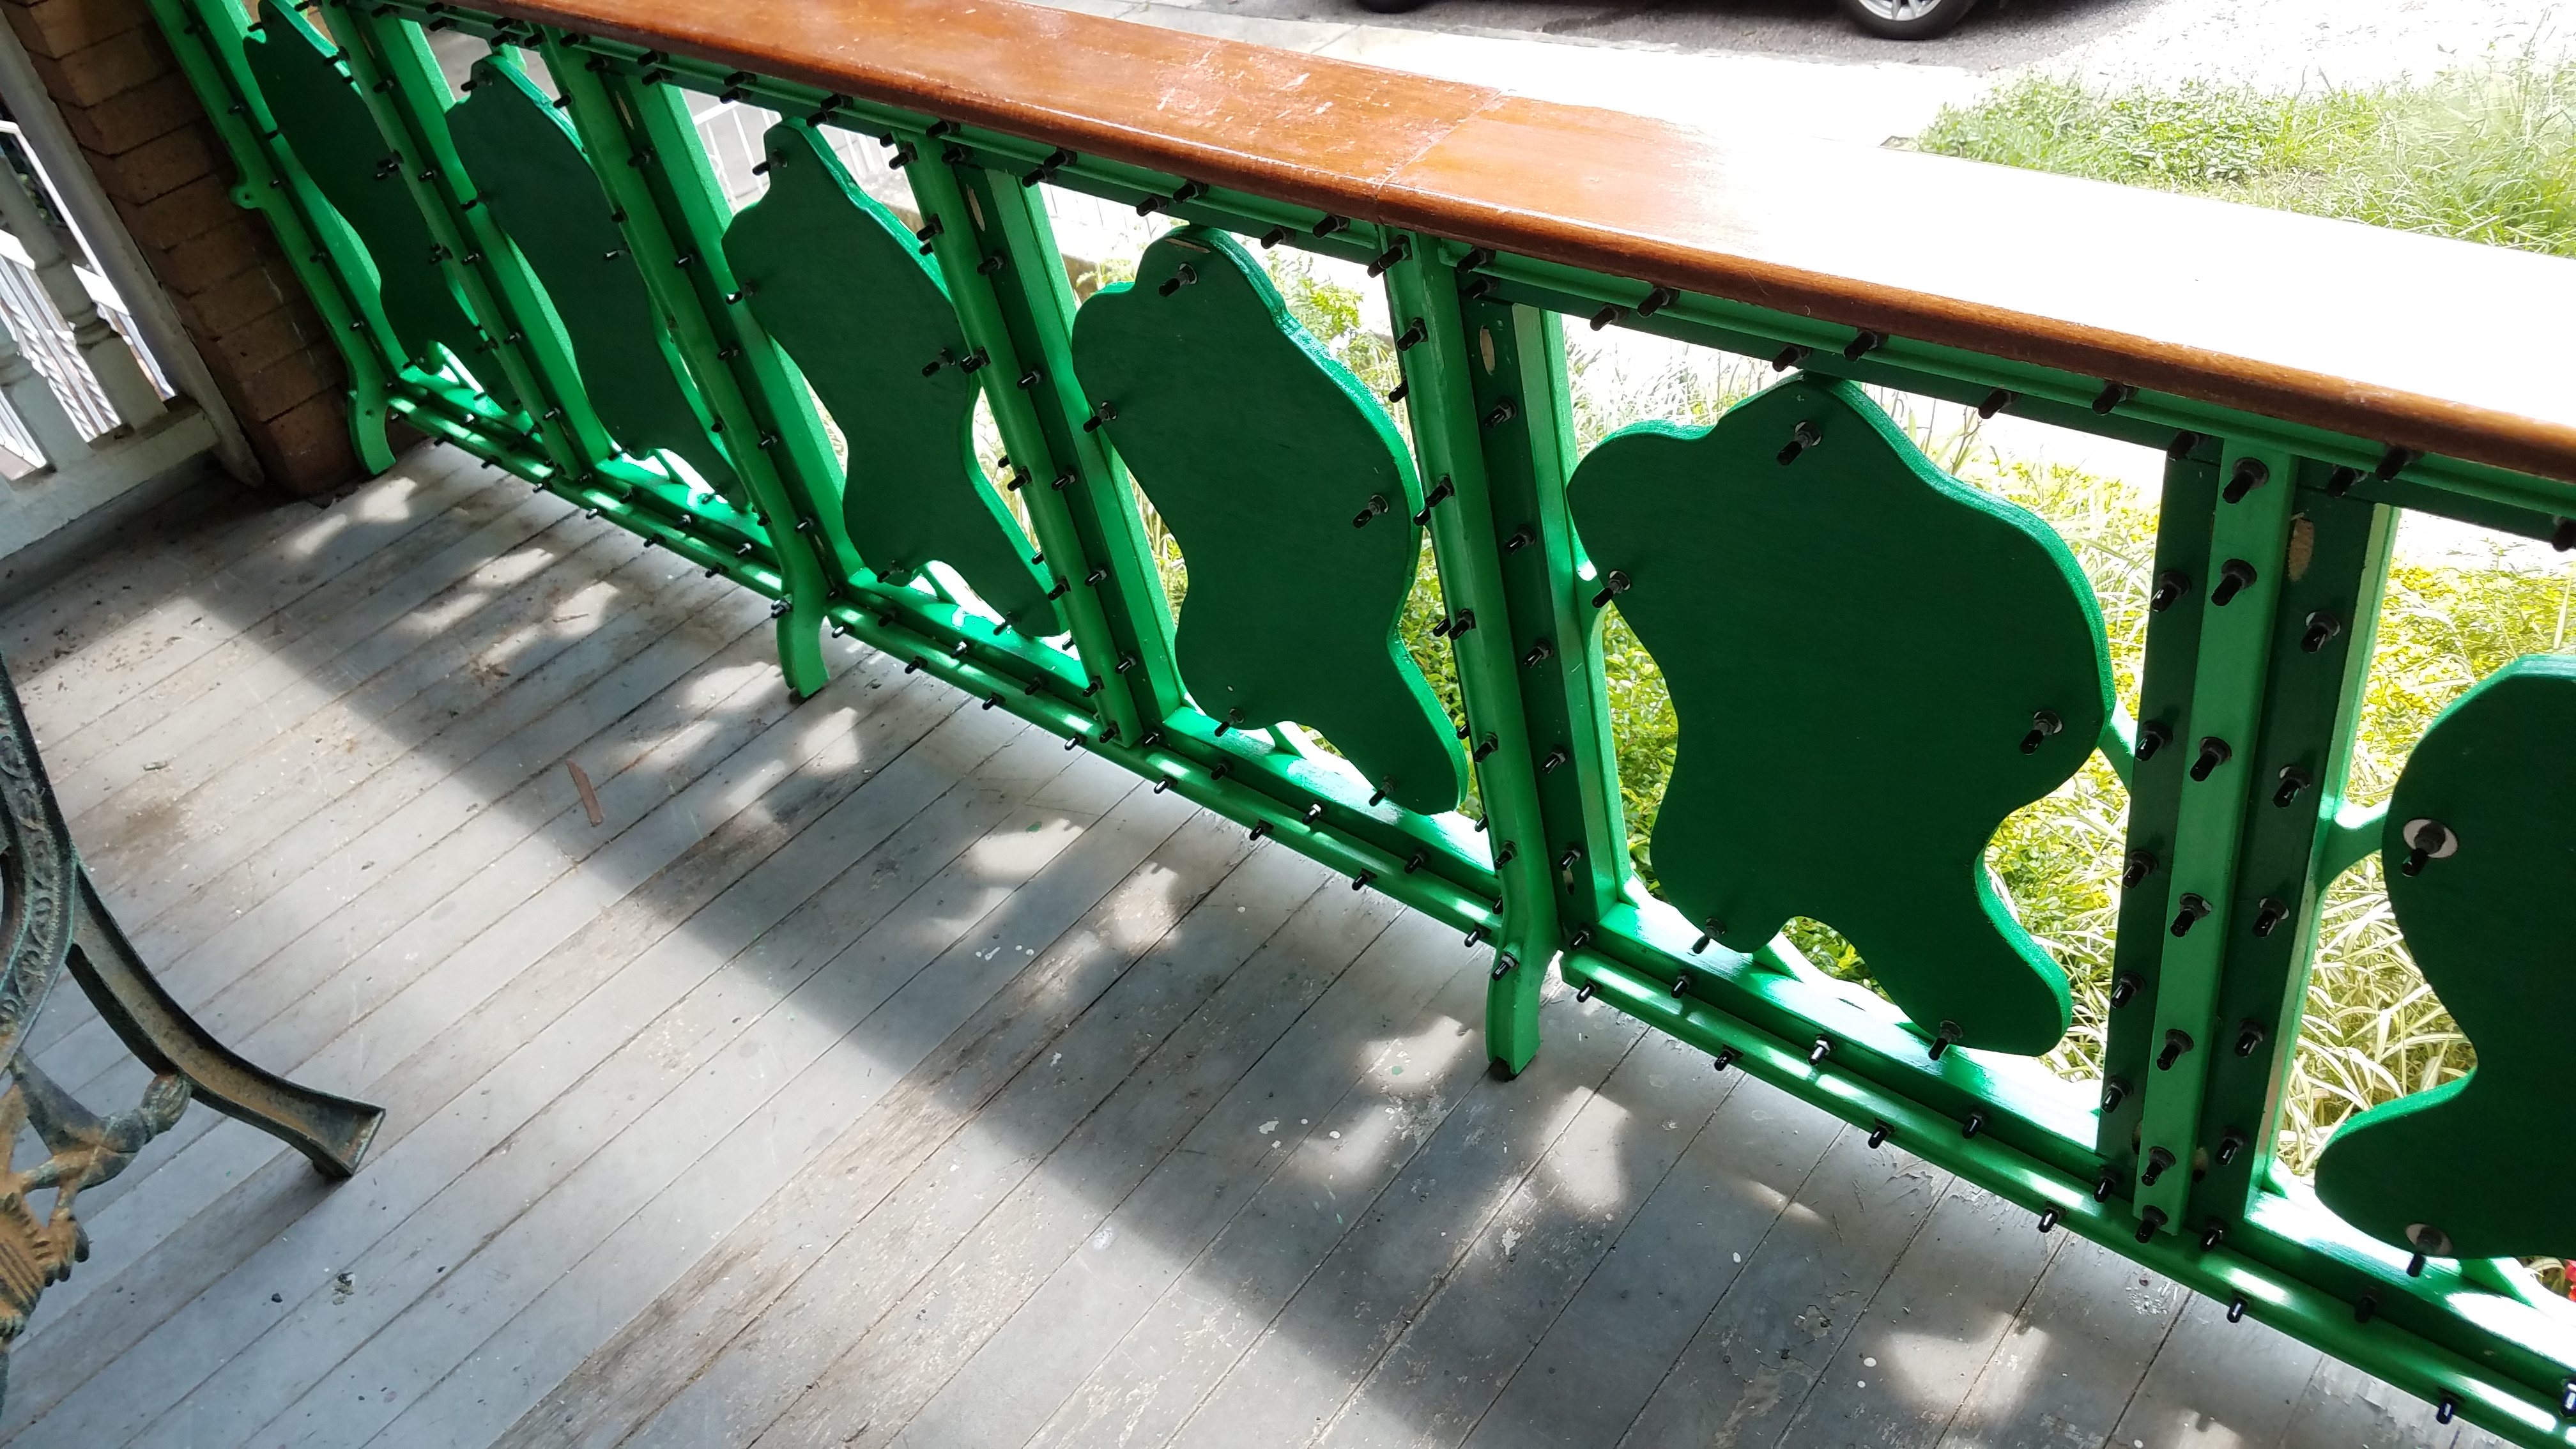
The next step was to make the actual frame for the railing, the part that gives it its actual structure. This was pretty simple: I used Douglas fir 2x4s. The fake girders, those bits of light green with the bolts, were also Douglas fir: I used some tricky router table magic to make those rounded-lip edges. (They are far from perfect, and if you look close, the ends are pretty ragged.)
And in the middle, the fake girders had to do some structural work. The main horizontal supports– the dark green 2x4s–weren’t wide enough to run the width of the railing as one solid piece. They meet in the middle. So, those light green girders there actually reinforce and sister the join.
 Now, for the legs. As you see, there are two kinds of legs. The ones on the ends have these little knob-shapes so that I could sink anchors into the brick pillars on my porch. I wound up having to re-do these a lot. At first, the upper knobs were directly under the wooden railing– which prevented me from running a bolt through the main support beam. So, I made new legs, with that knob located about two inches lower. And at some point, I decided to remove the knobs from the legs in the middle. Oh, and the legs on the ends needed to have a little room to adjust, in case the width of the railing was off by a quarter inch or so.
Also– as if I hadn’t mucked this up enough– the bolt-hole for the bottom bolts was a problem. I’d meant for the bolt head to be countersunk. But I’d countersunk all of the bolt holes, which meant that the nut in the back had to be sunk… and then I wouldn’t be able to tighten it. So I stuck in a bit of dowel to extend it in back. (I’d do this differently now.)
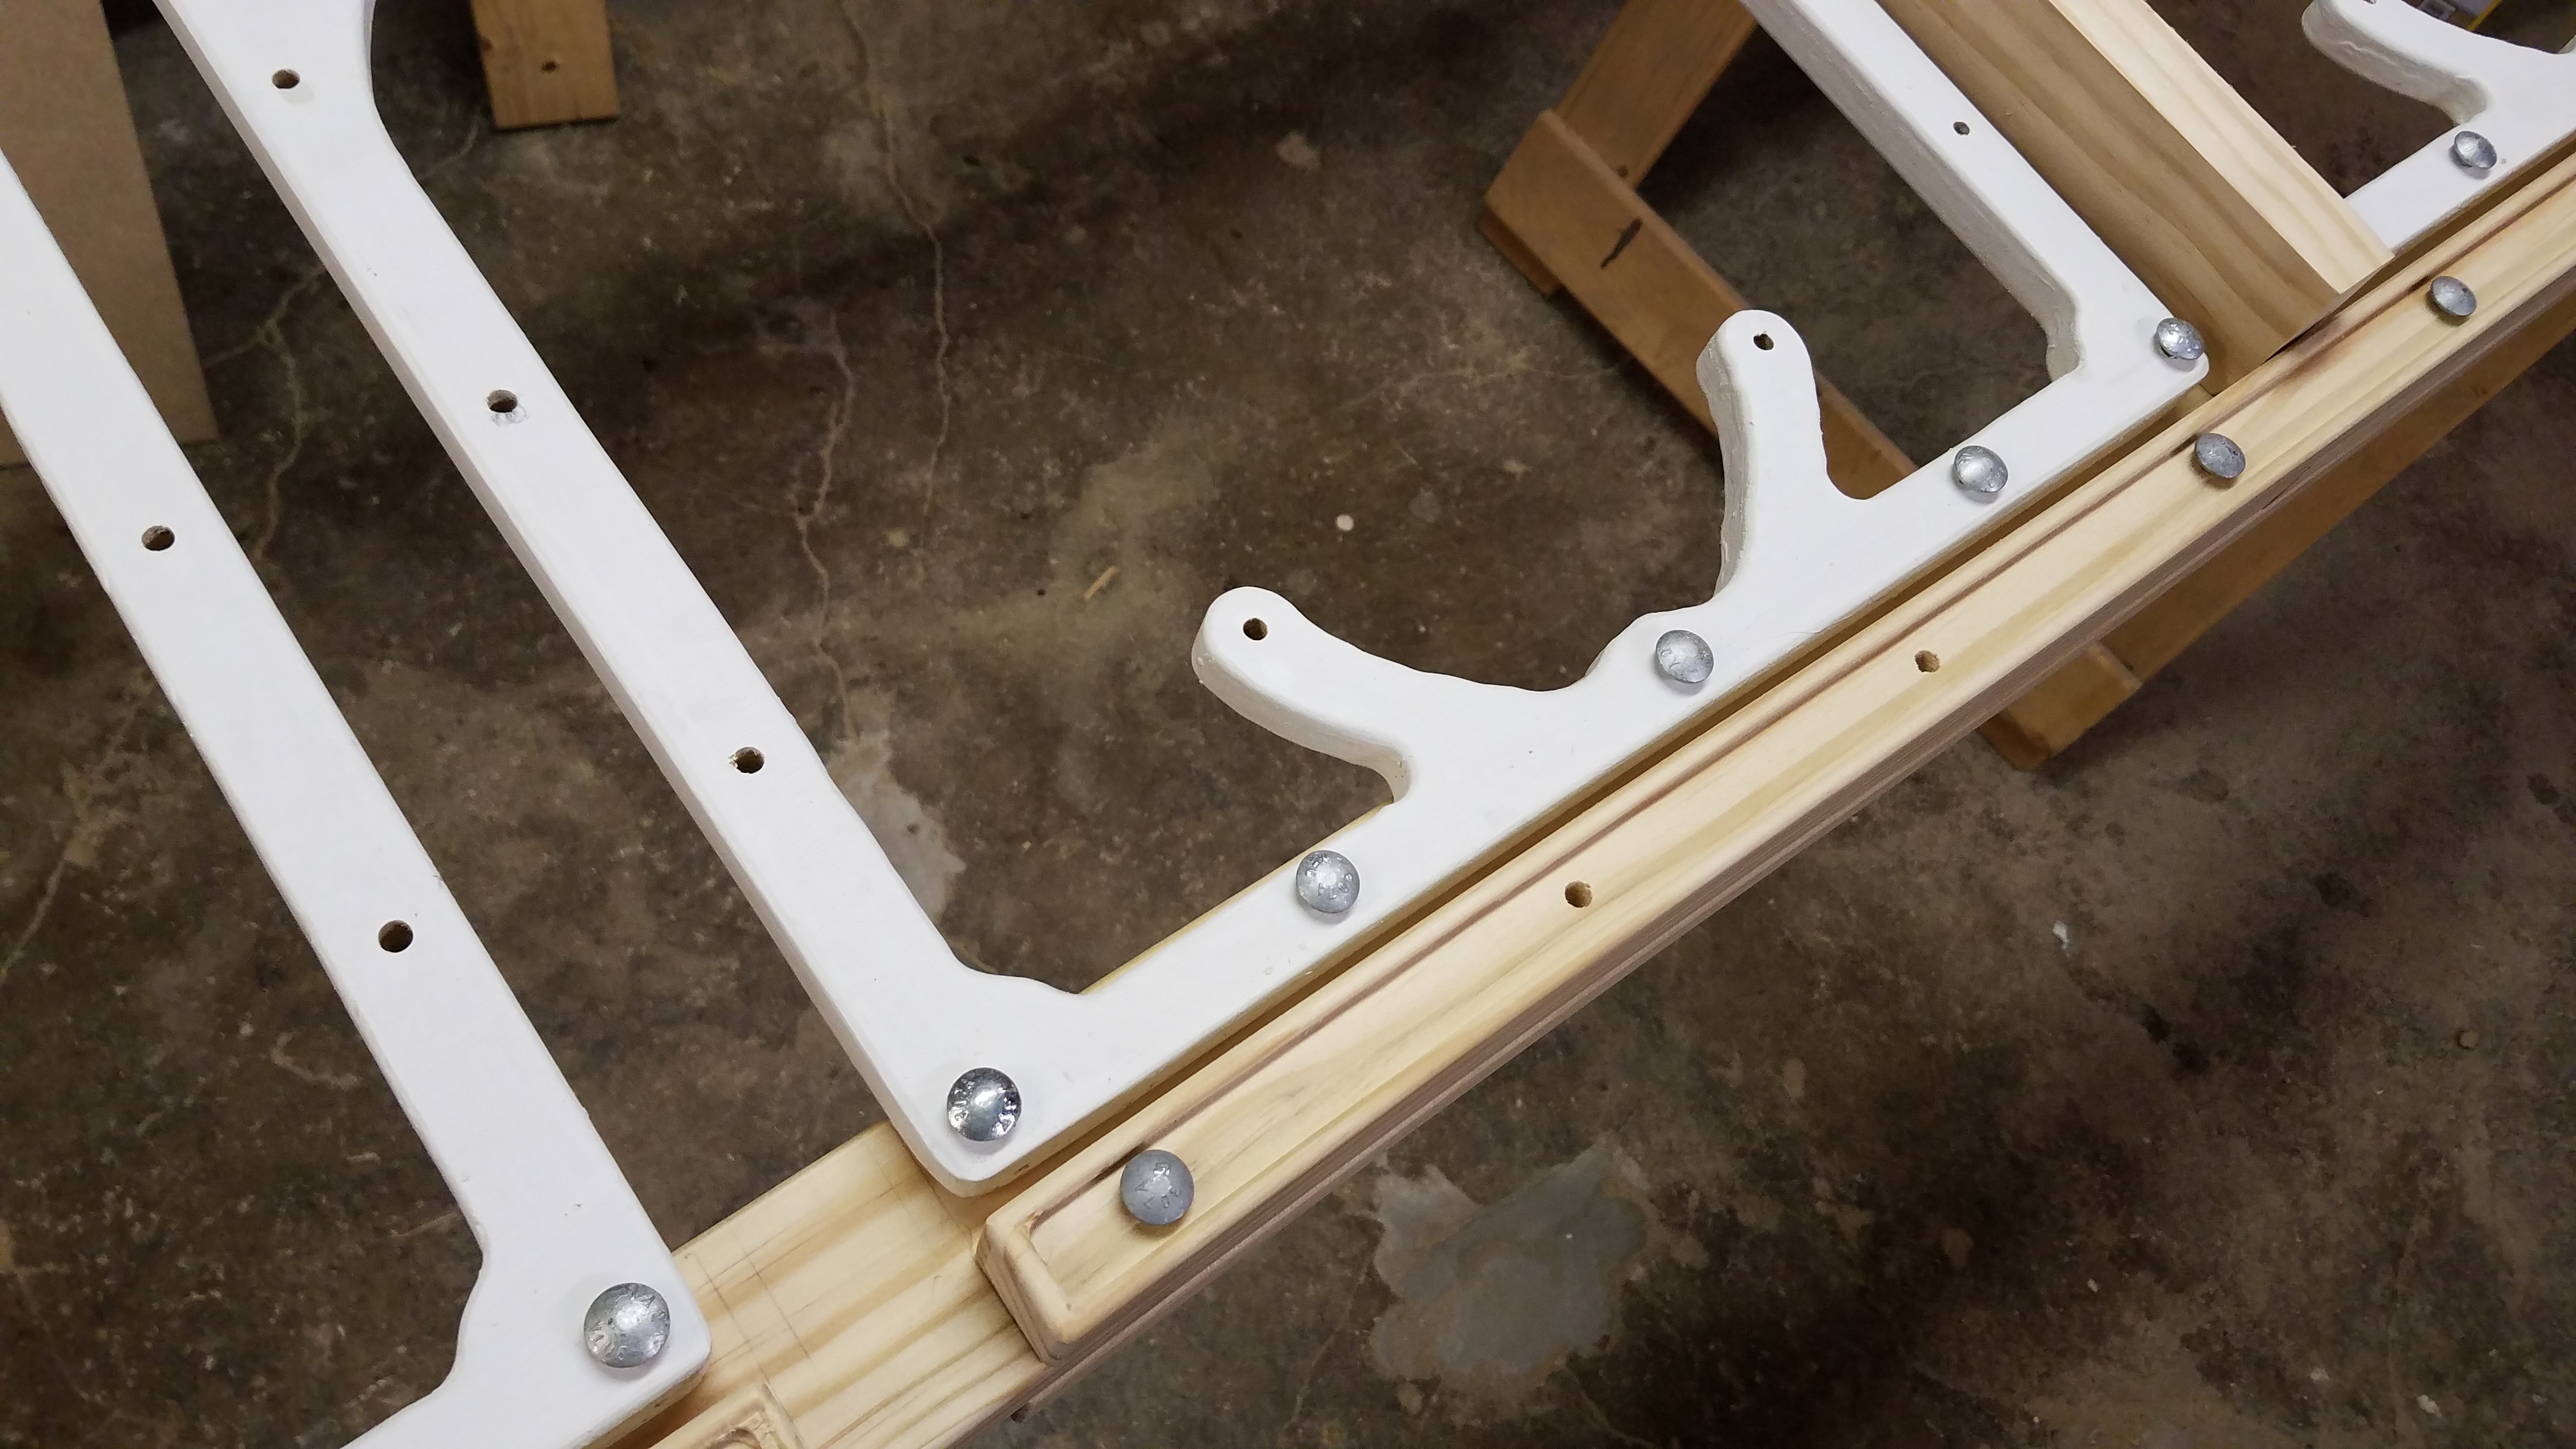 This next stage was a process of doing test fits, making fake girders, locating holes for the nouveau frames to mount to, and more. IO made a number of MDF templates to make sure I’d drilled the bolt-holes precisely. It was disorganized and messy, but the end result was… well, acceptable. By the way, the bolt holes on the main structure frame for the girders were all ¼”, and carefully aligned. But, the bolt holes on the main structure frame for the Nouveau frames were ⅜”. The frames had twenty bolts per, so making them match the holes precisely wasn’t realistic– and the frames were decorative, not structural, so the wiggle room was OK.
(By the way, on the back side of the railing, I put a lot of tiny rubber covers onto the ends of the bolts. That’s to protect people who might bump into them.)

Test fits
Throughout all of this, I was also giving all of these parts a really thorough paint job. That definitely helped with making this look like ironwork, as ironwork usually has several dozen layers of paint applied over the years, so a thick-looking paint job added to the look. I’d originally wanted to do it all in a rich, darker green, but my housemate L insisted on a lighter, oxidized-copper color that was closer to the pale greens of Paris ironwork. I figured on doing the main structural frame in a dark green, and the fake girders and Nouveau frames in the lighter green, and the contrast worked out really well. But the work involved a layer of Killz primer, and then, two coats of Behr exterior paint-and-primer. Sometimes this required redrilling the bolt holes to clear out the dried paint. This lead to a lot of wear and tear on the parts, which some plywood splintering off when a bolt was pushed through, or paint tearing off if two parts rested in contact with each other for too long, or a bolt hole needed to be redrilled.
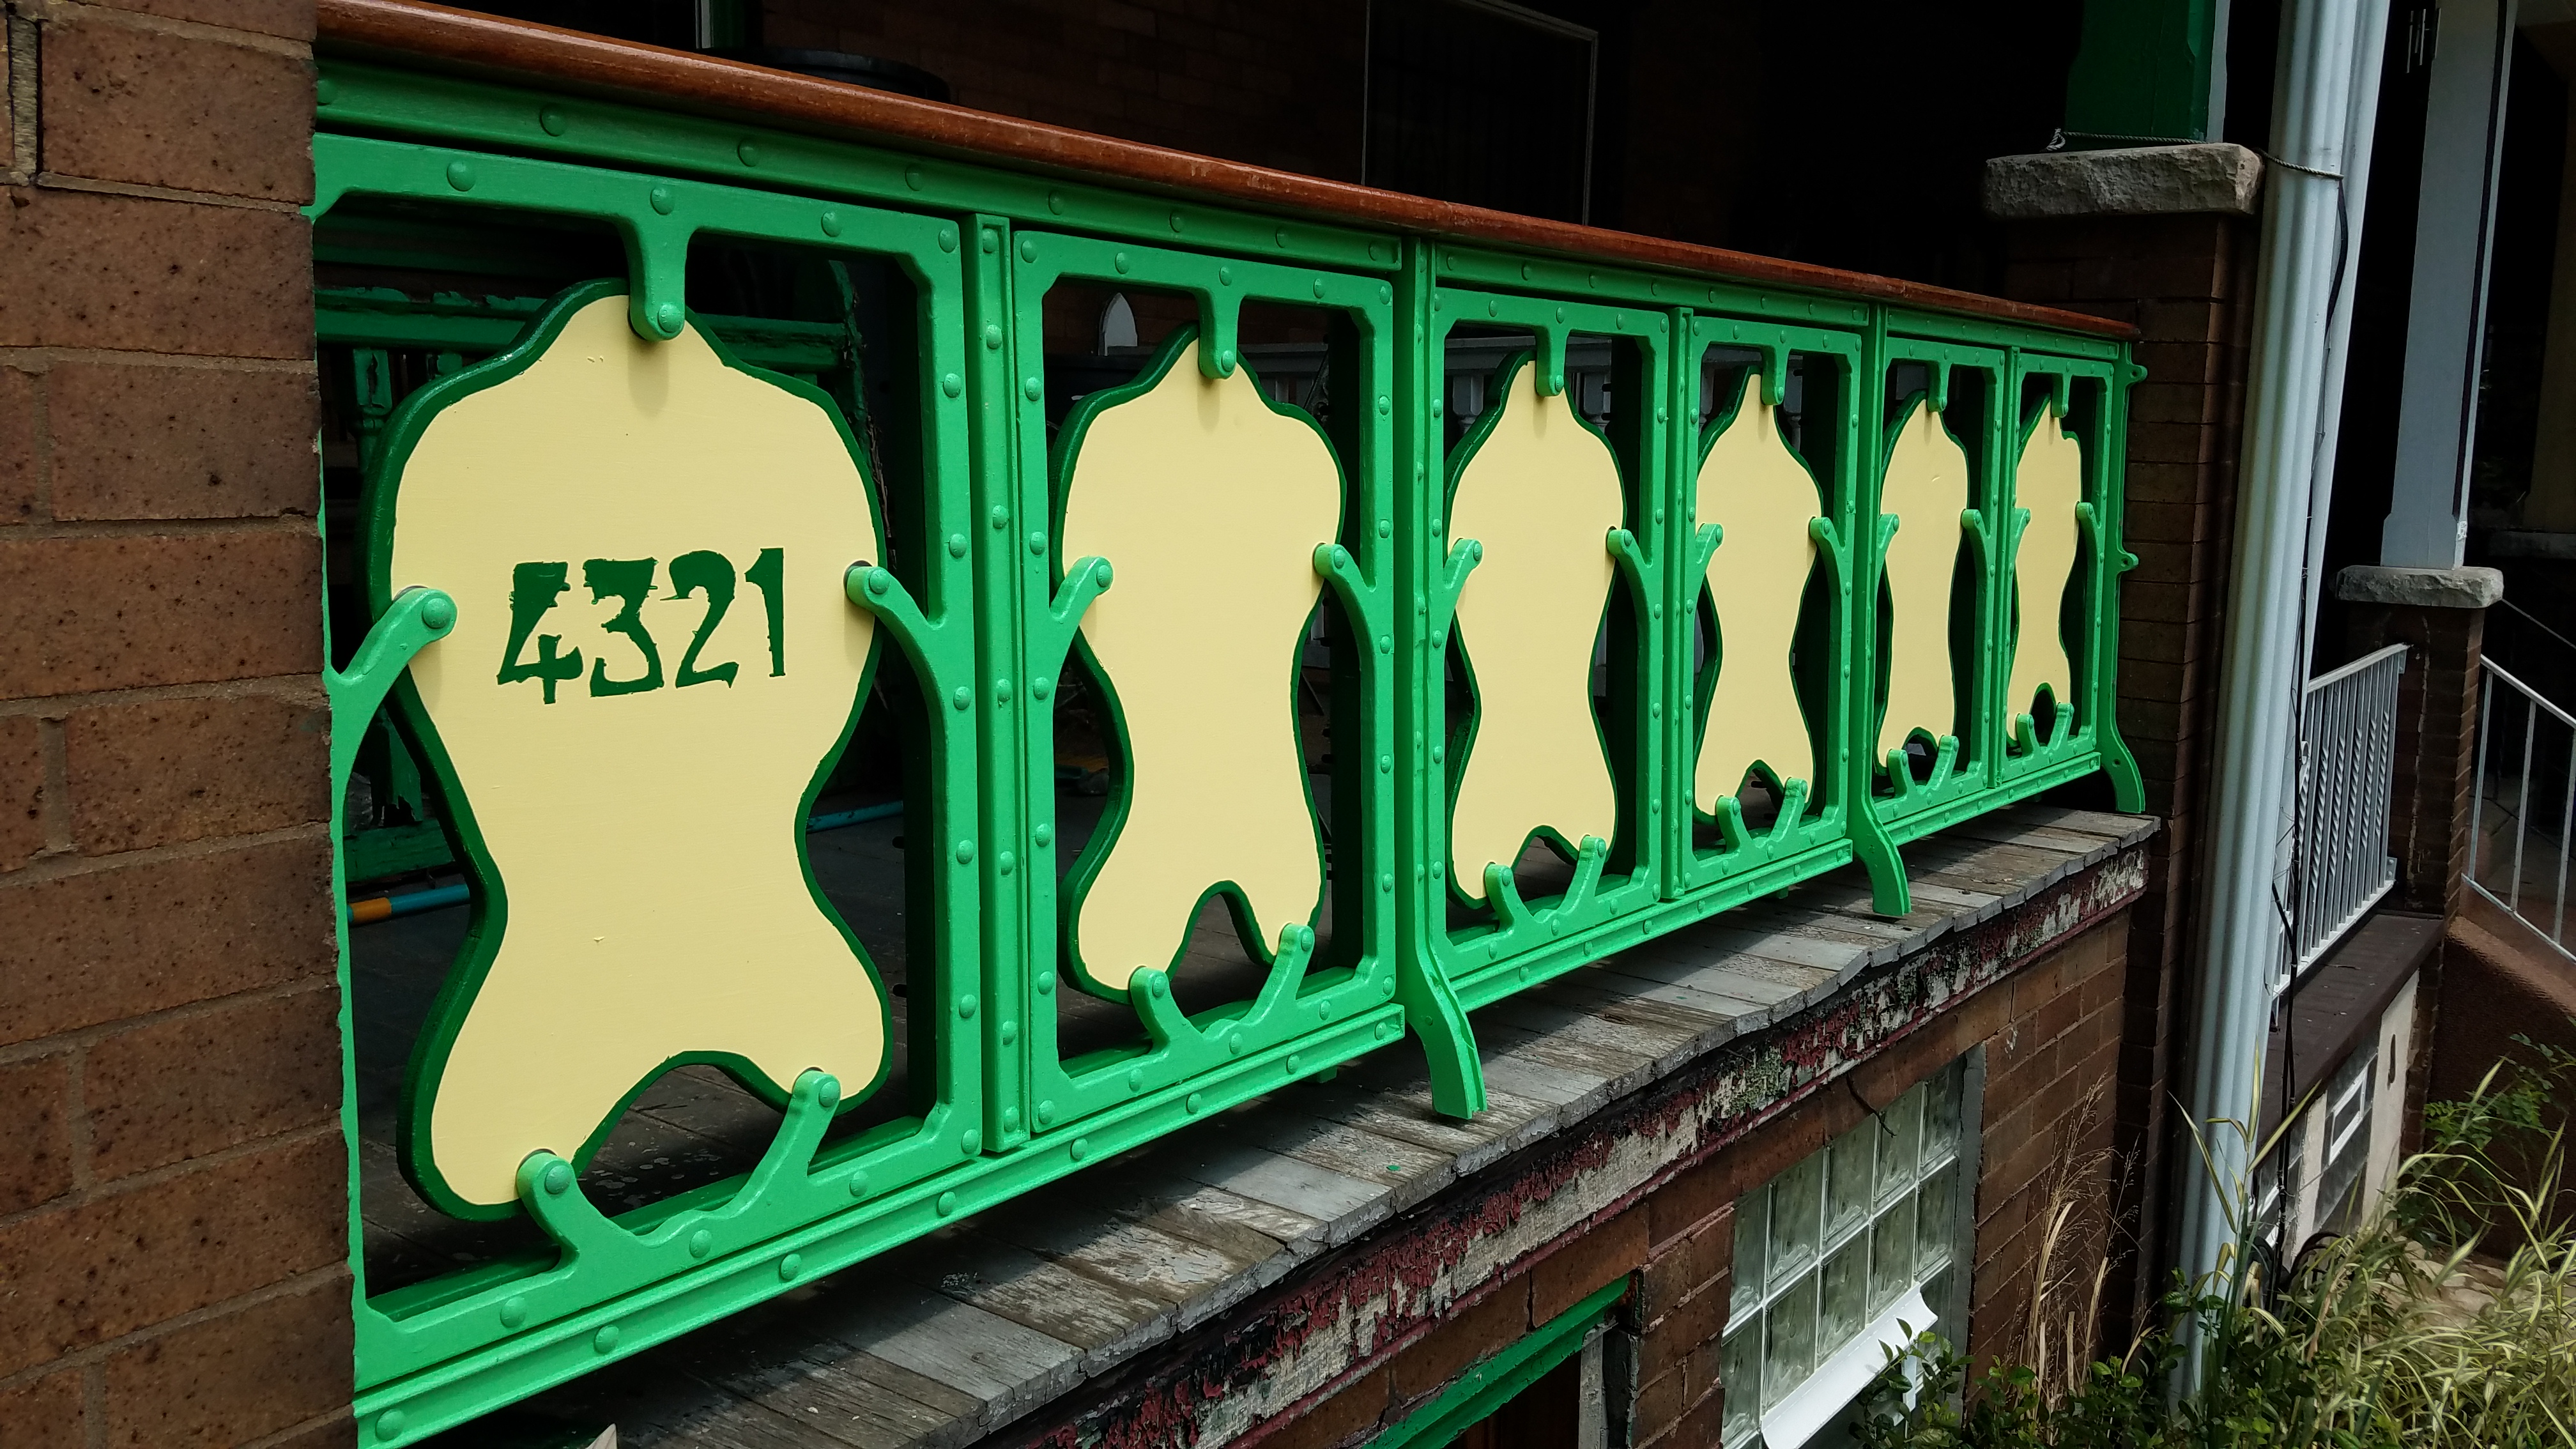
Finally, there came the time for the top of the railing. Lots of ideas for this one. I have an old interior stairway railing that was long enough, and lovely. But it wasn’t wide enough to work, visually. I’d thought of a thin board made to look like another iron fixture, but I liked the contrast of warm brown wood on top of my green fake iron. And for years, I’d had these teak decking boards gathering dust in my basement, so I decided to use those. I wish I could have used a single piece, but sadly, they weren’t long enough, so I decided to cut them into three pieces to match the three sections of the railing. (I may add on pieces to cover those joins later on.)
But uncovered wood doesn’t fare well in direct sunlight, so I did some research on exterior finishes. Turns out the most durable finish, favored by boatbuilders, involves laying down two coats of epoxy, to seal the wood from water, and then a layer of marine varnish. Yet another opportunity to try something new, I guess. (Another flaw in my design: the top is attached with screws driven up through the fake girders. And they can’t be inserted or removed without removing the frames first. Oh, well: it’s not as though I’m going to be changing it very often.)
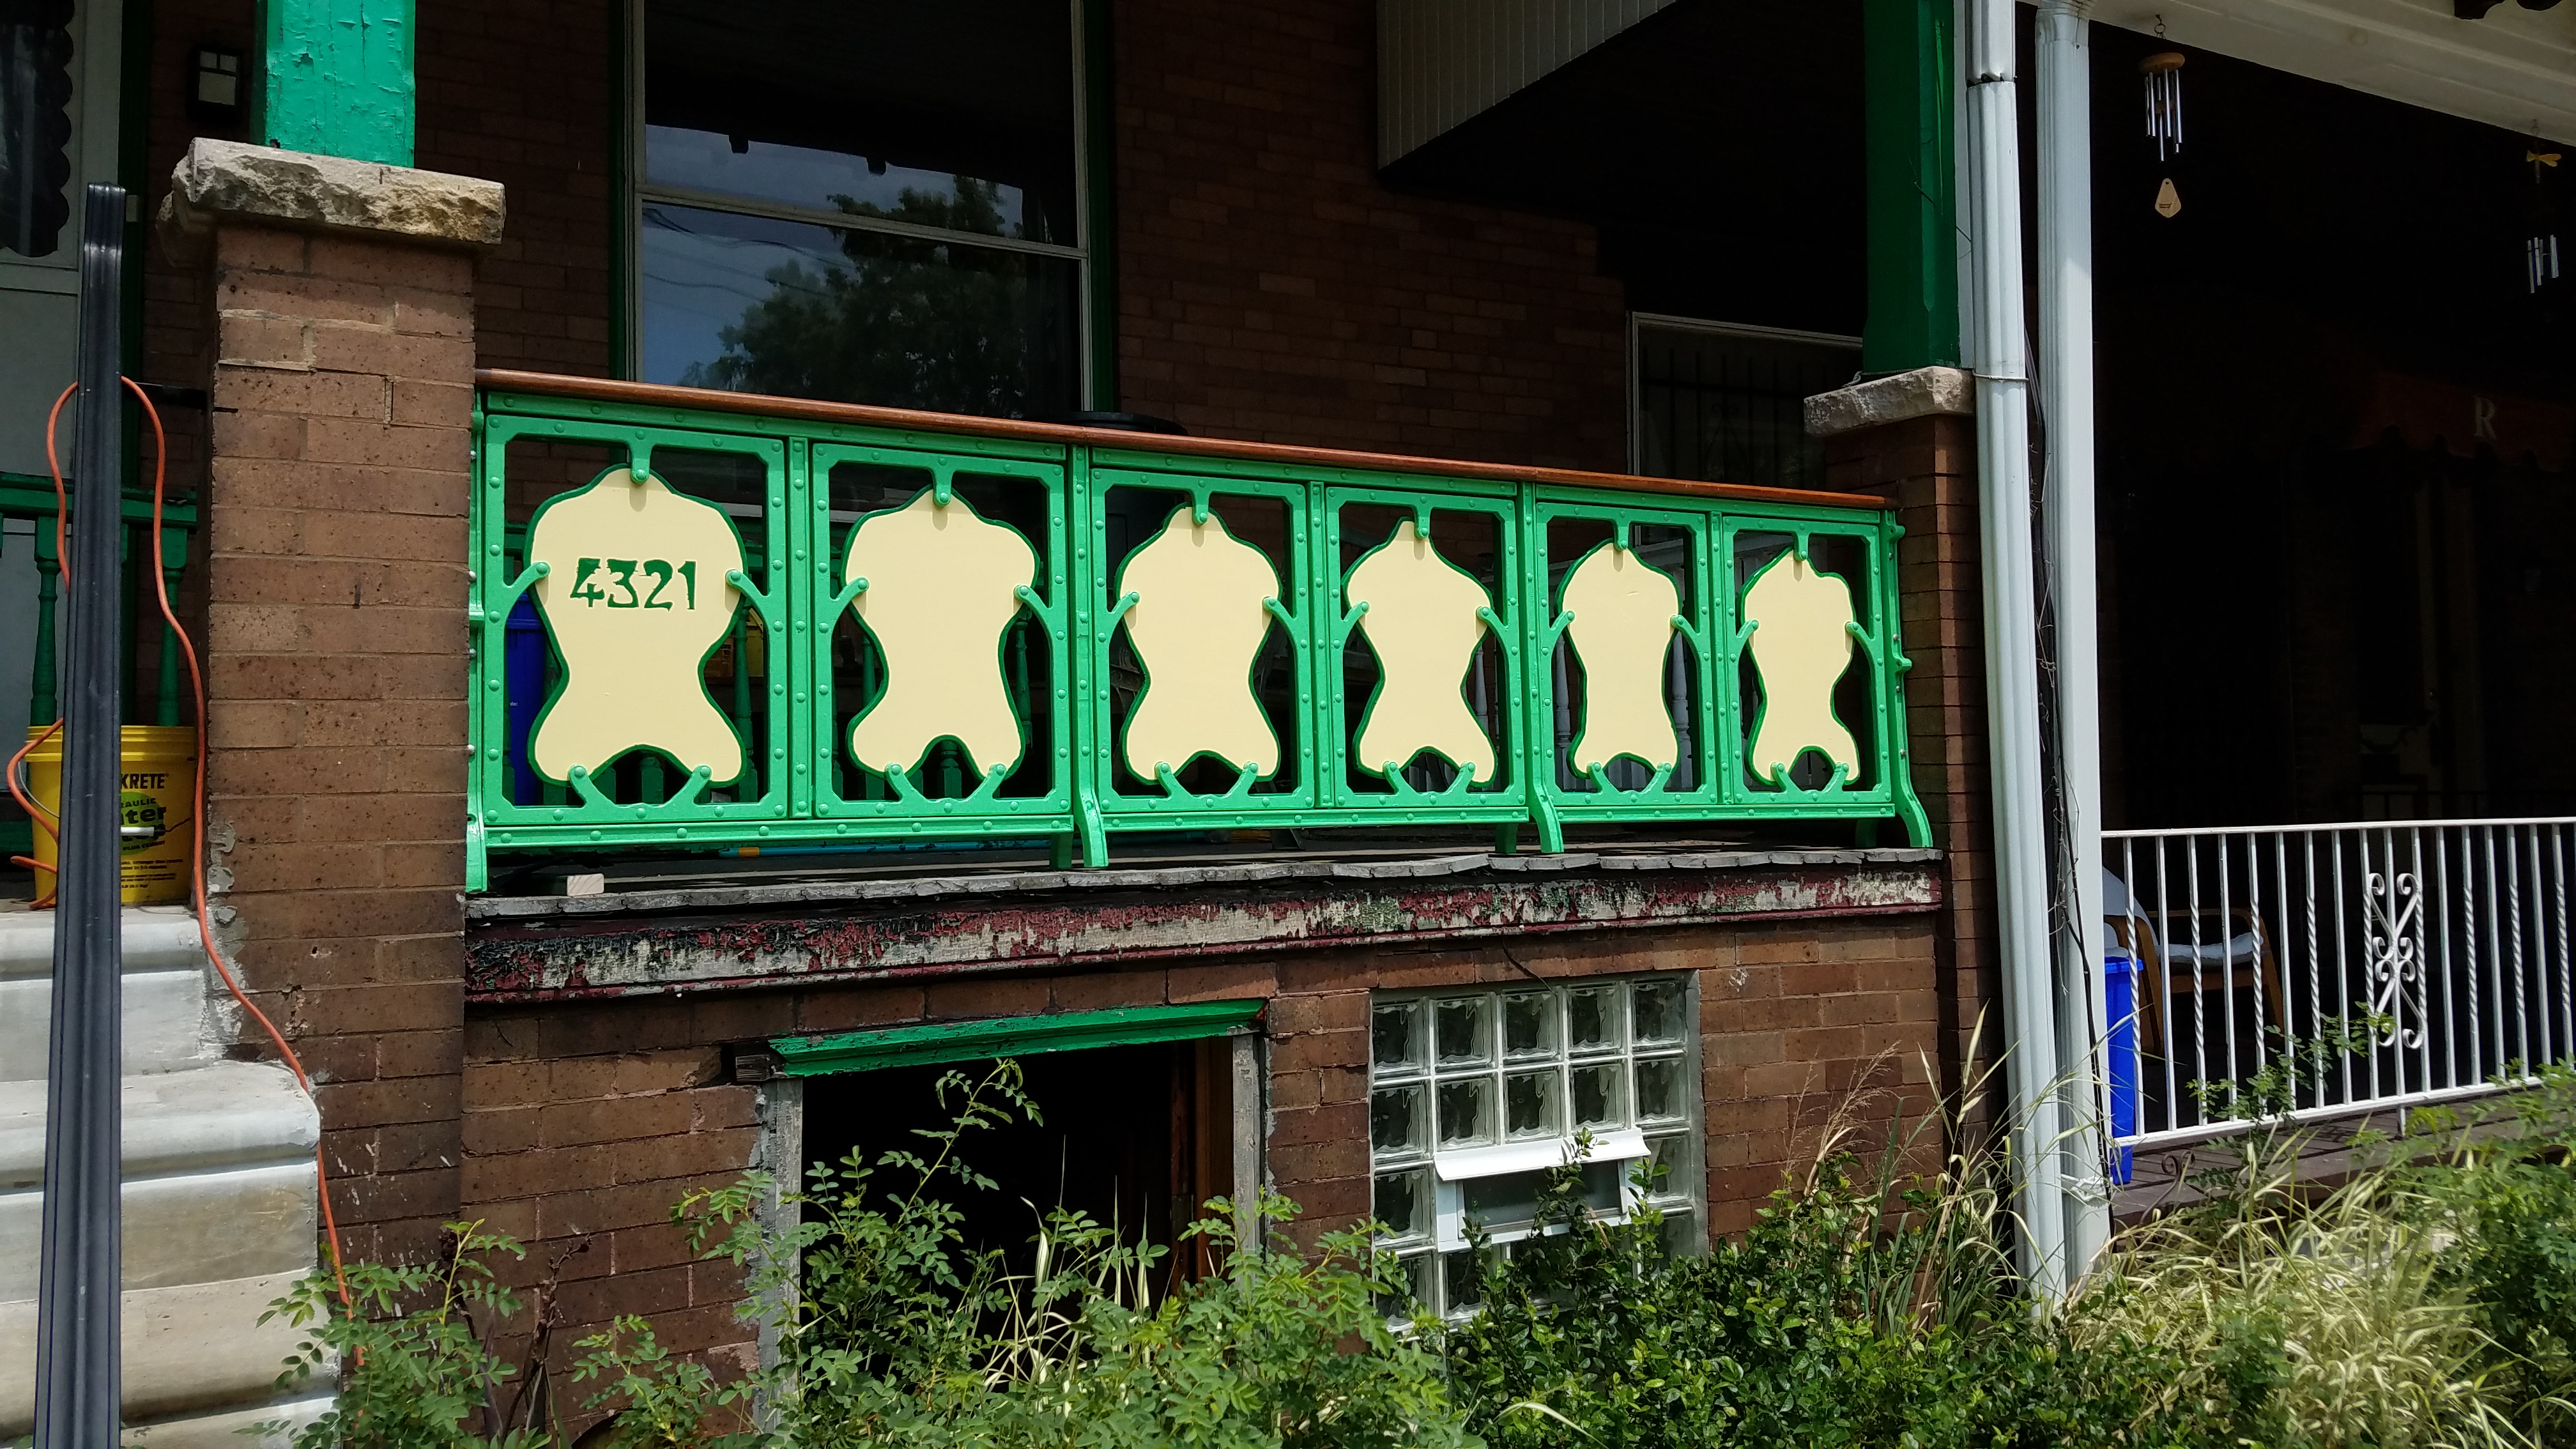
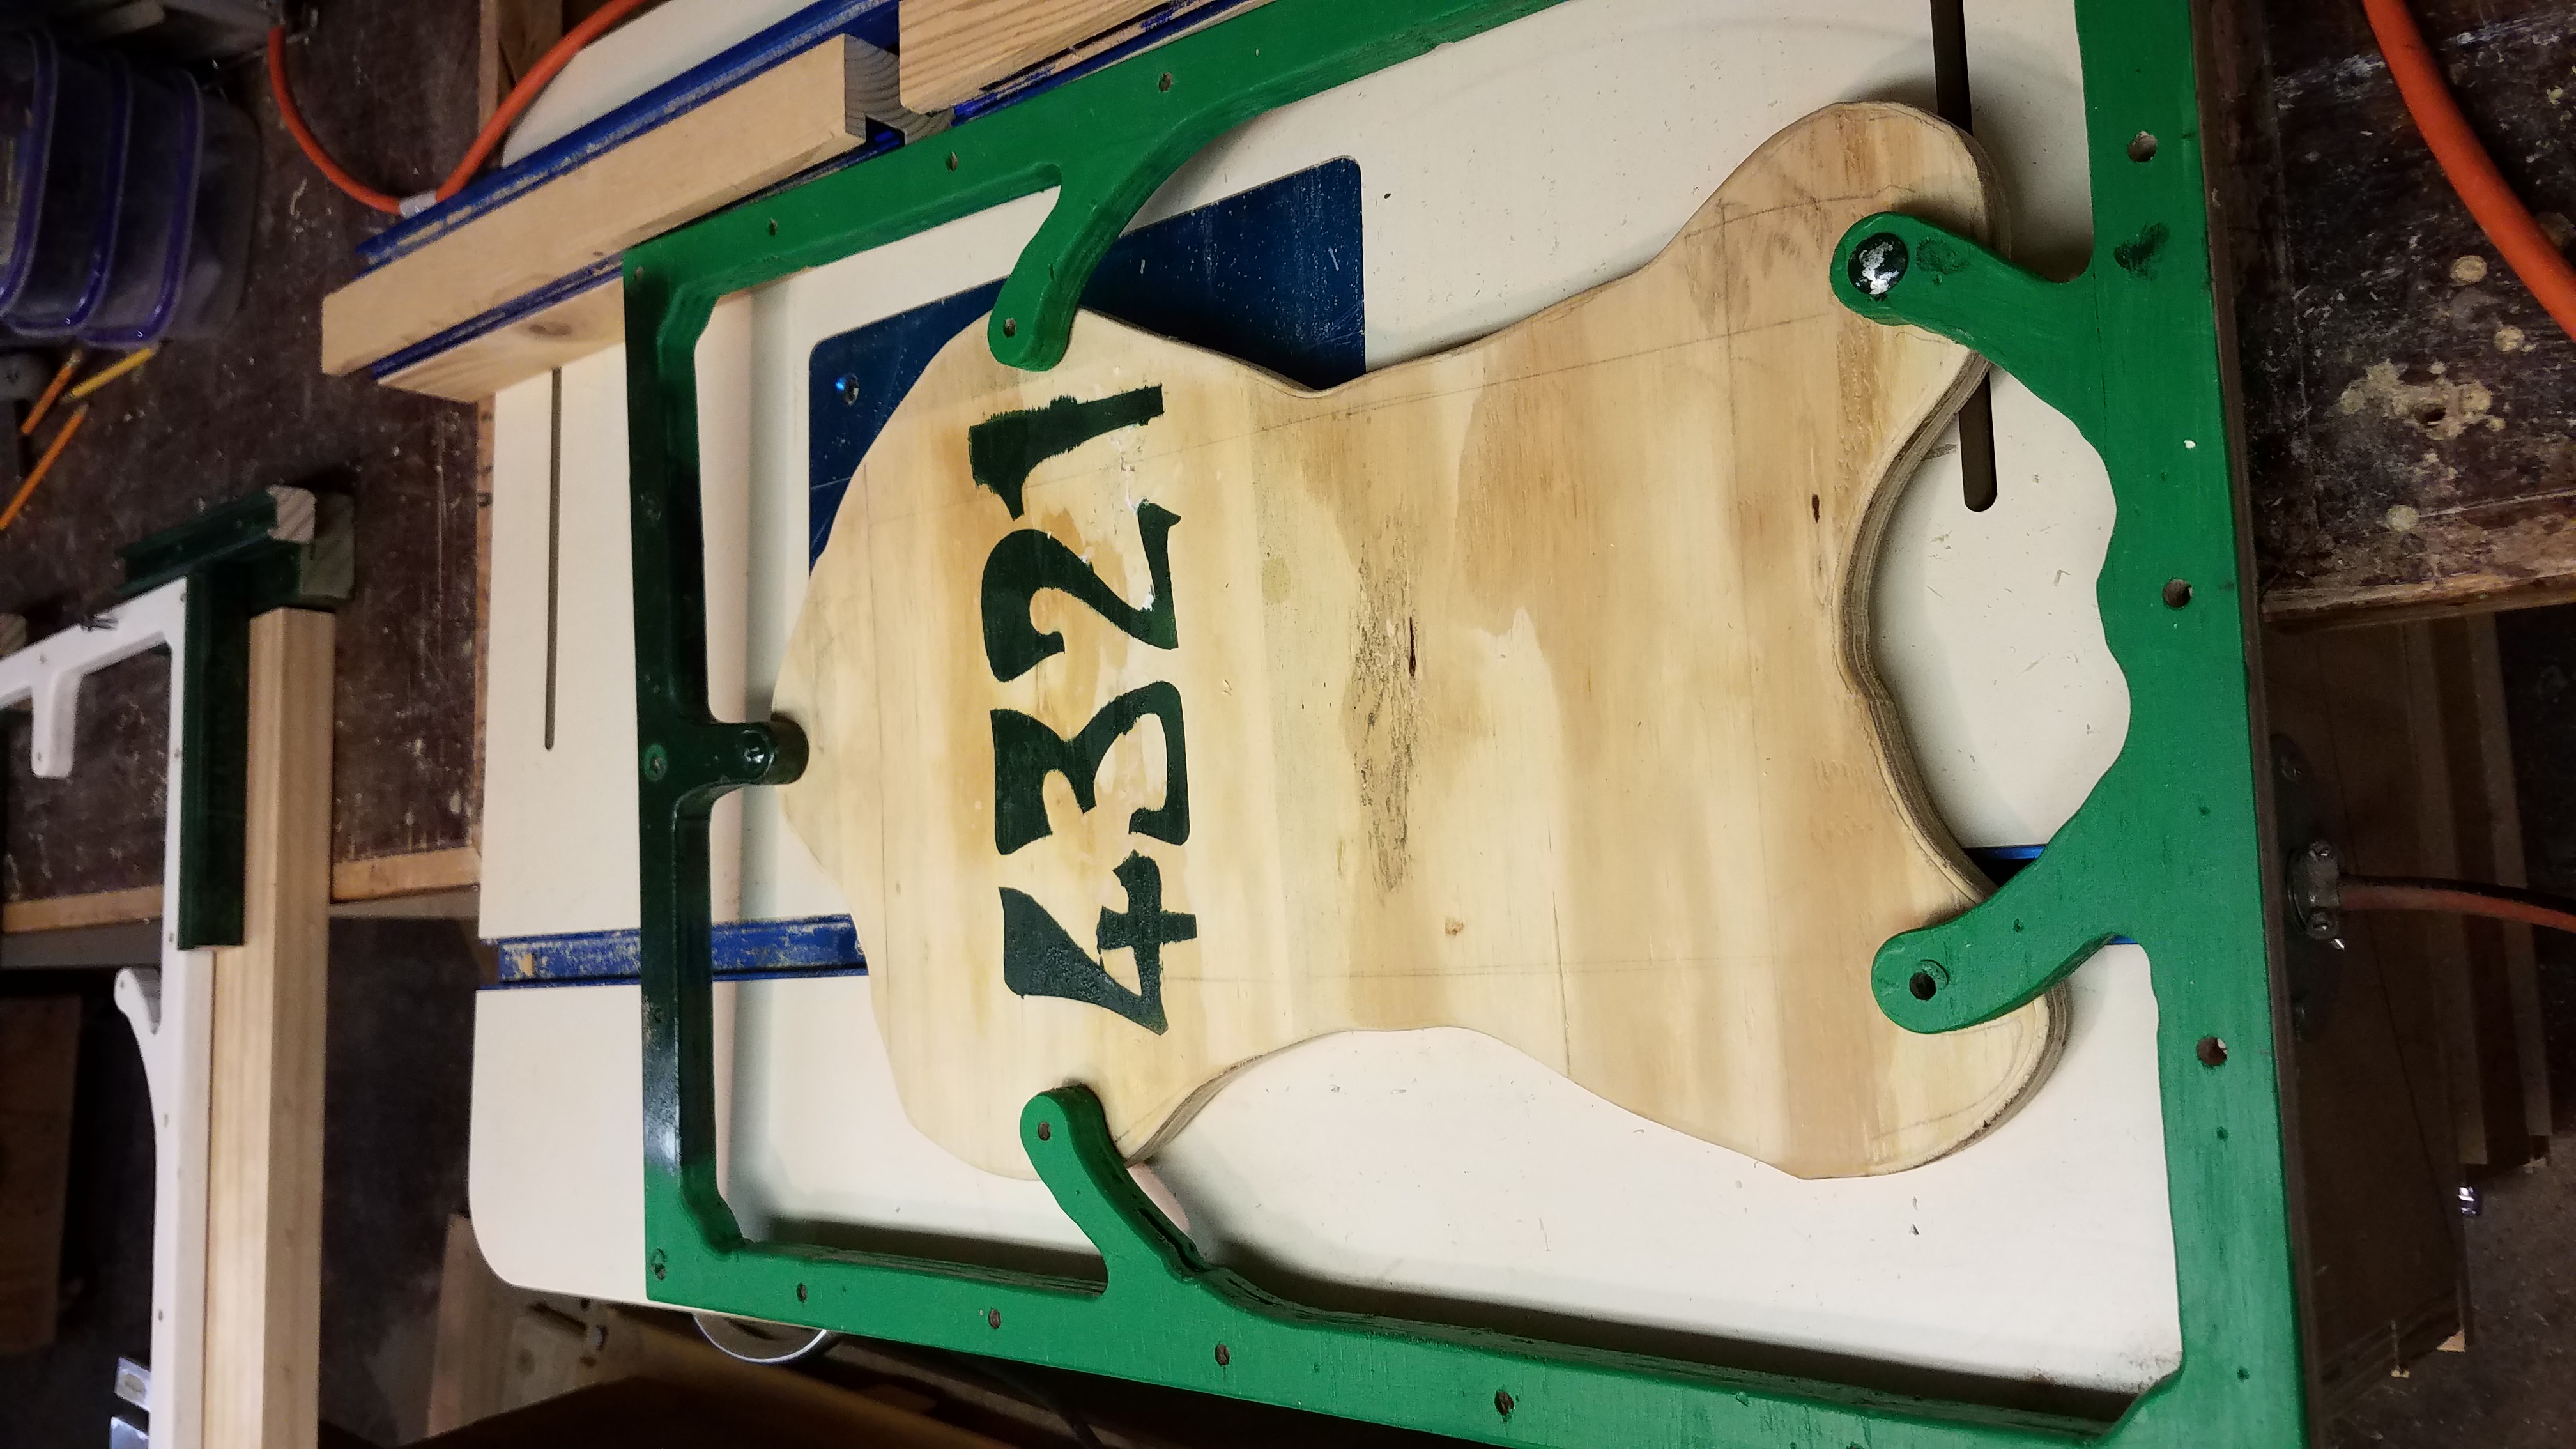 The last pieces to add to the project are the piece of wood inside the nouveau frames. Now, the pieces you see here are not the final pieces of my design. They’re there mainly as placeholders, installed to keep the porch railing within building code (i.e, remember the babies’ heads?). They’re made from scrap lumber– specifically, the plywood I’d cut from the Nouveau frames with my router. I gave’em a quick paint job and put’em in place, and people promptly told me that they looked like teeth or broiled chickens. In the future, I will replace these plates with better designs, as they occur to me.
I finally installed the Front Porch project on July 26, 2018.
Rear of Front Porch Project July 26, 2018
Front Porch Project July 26, 2018